Women & Men
Corrections & complication management
Consultations with medical professionals who provide personalised recommendations with empathy.
Procedures performed in accredited medical facilities, with strict safety and hygiene standards.
Outcomes carefully aligned to your personal preferences, concerns, and desired outcomes.
Cosmetic correction plans designed with your comfort and safety as a priority.
If you’re concerned about the results of a previous cosmetic treatment and are considering correction or adjustment, you’re not alone. It’s common for people to seek revision when the outcome is not what they had hoped for.
At Cosmetic Connection, our experienced team consults with patients who are looking to address results of past treatments. We take the time to carefully assess your concerns, explain the options available, and design a plan tailored to your needs.
Your comfort, safety, and goals are at the centre of our approach. With attention to detail and a focus on natural, balanced outcomes, we provide clear guidance and supportive care throughout the revision process.
If you’re looking for advice or treatment planning to improve a previous cosmetic procedure, we’re here to help you explore your options with expertise and care.
Start your booking process by providing us some details
As seen in


Why book a consultation with us for correction & complication management?
We are a doctor-led cosmetic clinic experienced in helping people address concerns from previous treatments. It all begins with a personalised consultation to discuss your goals and plan the best next steps.
Doctor-Led Expertise
Our treatment standards are set by experienced cosmetic doctors, prioritising your safety, and the highest standards of care.
Supportive Care
From consultation to follow-up, we prioritise open communication and ongoing support so you feel confident at every step.
Tailored Solutions
No two cases are the same — we design a personalised plan that addresses your unique concerns quickly and comprehensively.
Safety First
Your wellbeing is our top priority, with treatments carried out using evidence-based techniques and strict medical protocols, in facilities with high standards of hygiene.
Treatment info
Treatment objectives
Suitability
Preparation
Aftercare
Results


Your Experience
Step 3 of 3
Enjoy natural-looking results
After your treatment, we provide clear post-care instructions, so you can enjoy your results and get back to your day.
All treatments include an optional complimentary follow-up, and are backed by our satisfaction guarantees for complete peace of mind.

Adjusting previous treatments
Cosmetic treatments sometimes involve placing various substances under the skin. Occasionally, a person may wish to adjust the results of a previous treatment if they are unsatisfied, feel their look has changed over time, or have experienced unexpected outcomes or side effects.
At Cosmetic Connection, our practitioners offer tailored approaches to refine or adjust previous results and manage various complications. These procedures may involve various methods that work with your body’s natural processes to help metabolise the previously placed material. This approach allows for adjustments that can be tailored to your specific aesthetic goals.
How corrective approaches work
Some of our methods are designed to help the body naturally process and clear previously placed materials. The effectiveness of this process may depend on several factors, including:
- The amount of material previously used.
- The type of material used in the previous treatment.
- The extent of the adjustment needed.
Even with a subtle shift of cosmetic material over time, a corrective approach can be an effective way to address the issue.
If you wish to undergo a new treatment after addressing results of a previous one, we often recommend a waiting period of approximately two weeks. This allows your body to fully heal, and helps achieve a balanced, natural-looking result.
During your private consultation, a cosmetic professional will carefully assess your situation, outline suitable options, and discuss the treatment process in detail, including any recommended waiting periods.
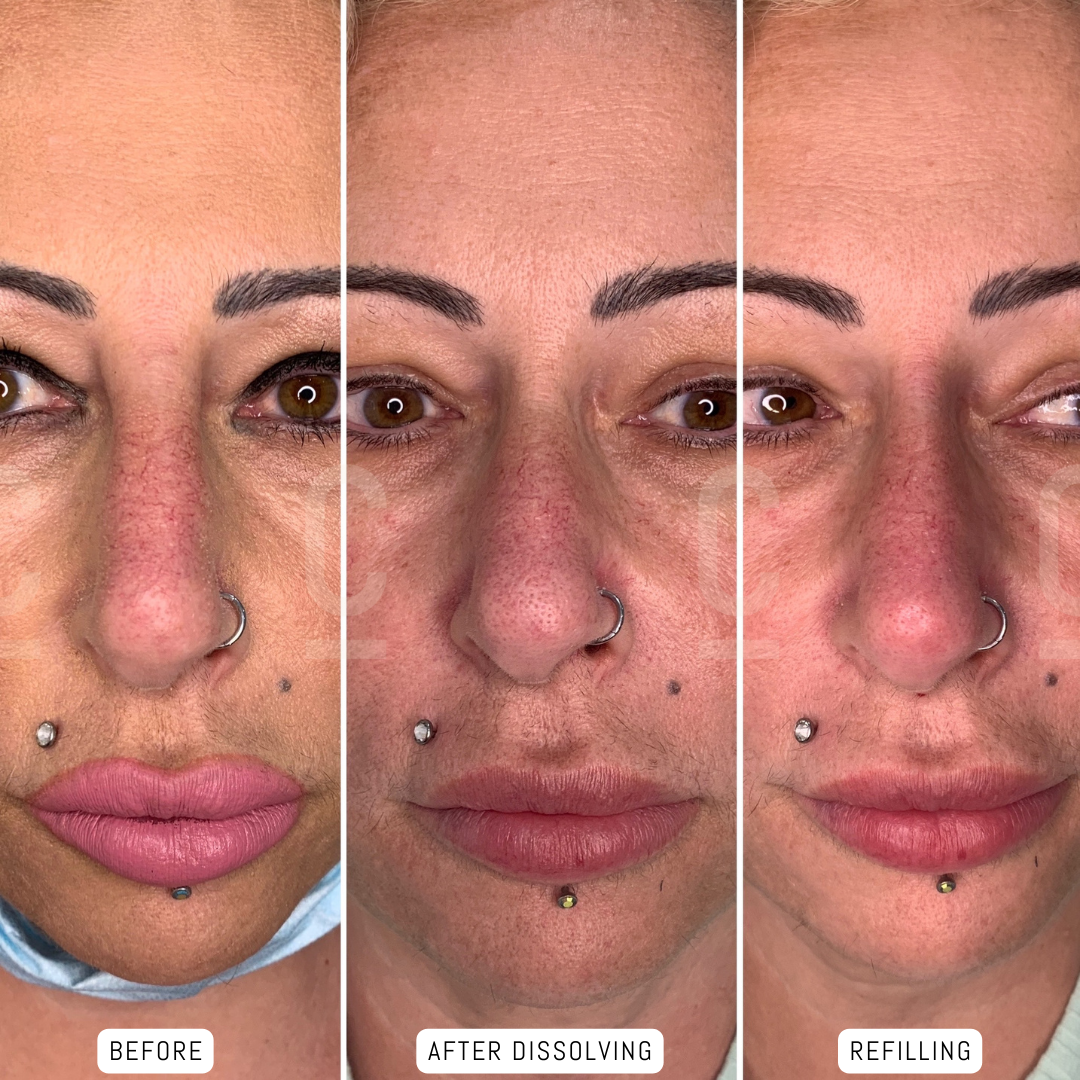
Common reasons to reverse cosmetic work
People may choose to adjust a previous cosmetic treatment for several personal reasons. It is common to feel a desire to refine a previous result if you have concerns about:
- Migration: When the placed material moves from its original, intended location.
- Subtle Irregularities: Visible lumps or bumps, particularly in delicate areas like the lips or under-eyes.
- Unusual Colouration: The appearance of a bluish or greyish tint that can sometimes occur in the skin.
In the rare event of an unexpected outcome, our experienced medical professionals are equipped to provide immediate attention and evaluate the situation.
At Cosmetic Connection, our practitioners assess each situation individually to recommend the most appropriate approach for your unique concerns. Your safety and comfort are our top priorities. We are here to provide honest advice and a personalised plan.
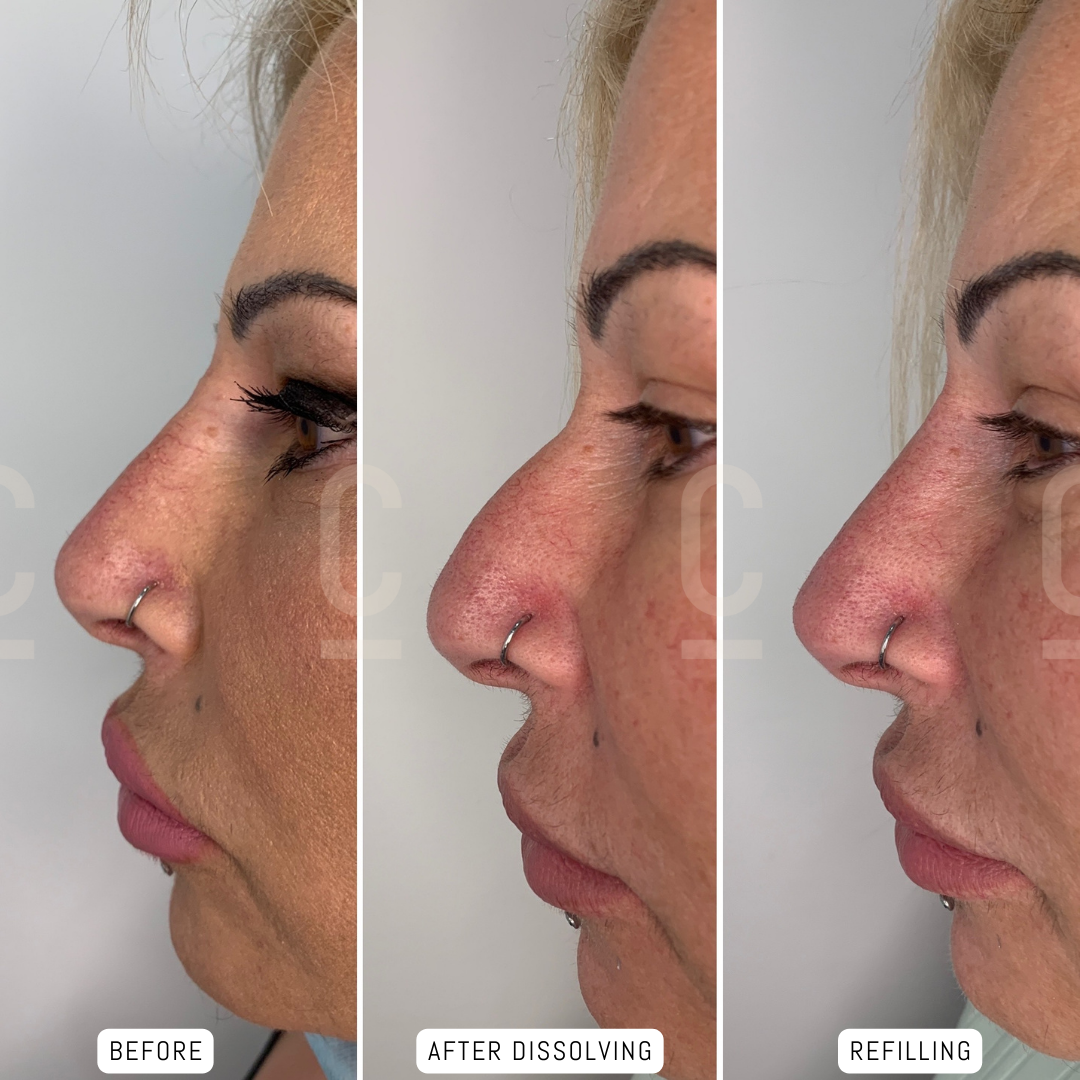
Why cosmetic volumising products may shift
Sometimes, cosmetic volumising treatments can move from their intended location to nearby areas. This shifting, or migration, is generally harmless and can be a reason to seek professional advice.
How unwanted outcomes may occur
Several factors can contribute to an unexpected aesthetic outcome:
- Placement technique: How and where the treatment is applied can influence the final result.
- Amount of product: Using more material than an area can comfortably hold may cause it to spread.
- Repeated treatments: Regularly treating the same area in a short period can sometimes increase the risk of an altered appearance.
- Treatment suitability: Using a treatment that is not well-suited for a specific area of the face can sometimes distort the shape.
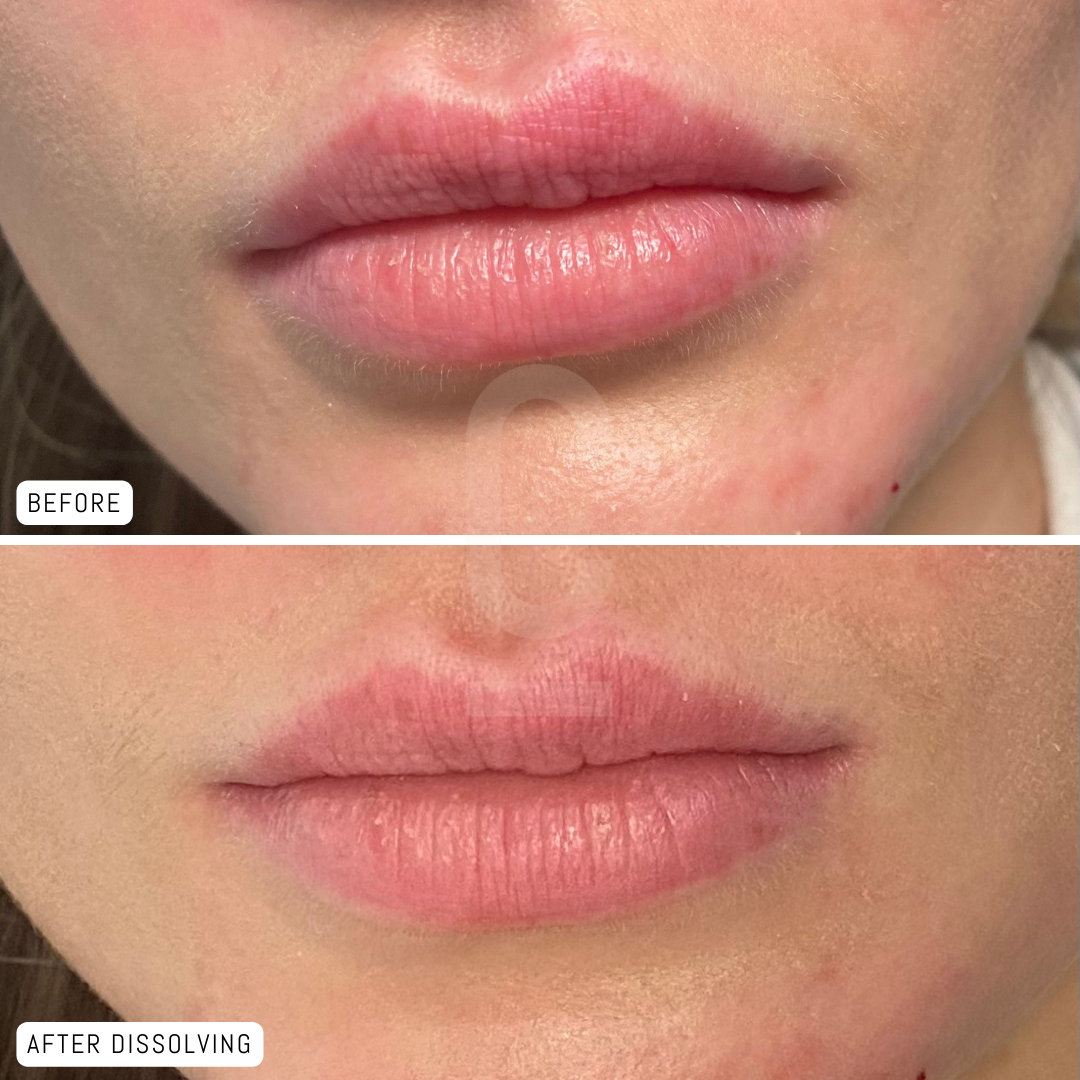
The lips are particularly susceptible to shifting due to their high degree of natural mobility. An unwanted outcome may sometimes present as an altered or unnatural shape.
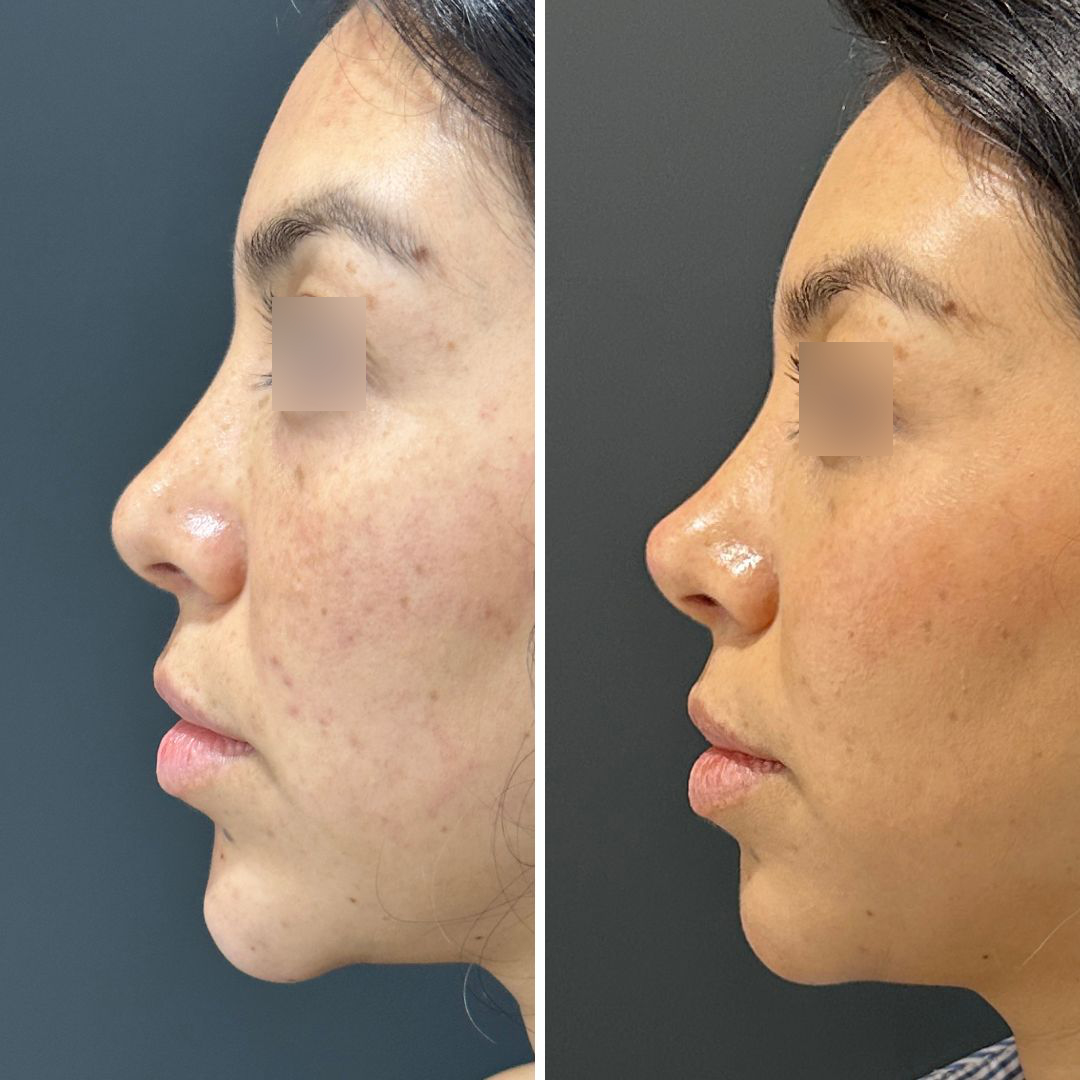
Our approach to correcting unwanted outcomes
If shifting occurs or the shape becomes unsatisfactory, tailored methods can be used to address the concern. This allows our clinicians to address the imbalance, refine the area, and help you achieve a more natural, harmonious appearance.
For a targeted approach, our practitioners will conduct a thorough assessment to determine a suitable course of action. During your consultation, they will discuss a personalised plan with you to help you achieve a balanced result.
Does cosmetic reversal affect Your natural tissue?
A corrective approach for adjusting a previous volumising treatment is designed to work with the previously placed material and is not intended to cause lasting changes to your natural tissue. Your body naturally regenerates its own molecules, and the process is tailored to maintain your facial structure.
It’s important to note that if a cosmetic result has been in place for several years, it may have been masking wrinkles and volume loss that continue occur over time. Once the material has been adjusted, these underlying features may become more noticeable, and your appearance might look slightly different than you remember.
The role of a professional in minimising risks
Adjusting previous cosmetic treatments involves specific methods to help your body naturally process the material. When administered by a trained and qualified medical professional, these procedures are designed to minimise risks. While they may be associated with temporary side effects, such as mild swelling, redness, bruising, or itching, a professional’s guidance is key to a positive experience.
How to achieve a harmonious result
To ensure the best possible outcome, it is essential to consult with a qualified professional who has extensive experience with these corrective approaches. They will:
- Determine the most suitable approach for your specific concerns.
- Use precise techniques tailored to your individual needs.
- Provide clear aftercare instructions and monitor your recovery.
Following your practitioner’s guidance and promptly reporting any unusual symptoms further supports a successful outcome. At Cosmetic Connection, our medical team is experienced in performing these procedures. We use techniques to focus on your comfort and a natural, balanced result.
How to reverse cosmetic volume without pain
We understand that the idea of reversing previous cosmetic treatments can feel daunting. At Cosmetic Connection, your comfort is our top priority, and our practitioners place high importance on minimising discomfort.
Here’s how we make cosmetic reversal as comfortable as possible:
- Advanced numbing: Strong numbing methods and ice are applied to the treatment area to desensitise the skin.
- Precision tools: Ultra-thin needles are used for treatments, minimising any discomfort.
- Comfort-optimised solution: Certain reversing methods can be prepared in ways that reduce discomfort.
Importantly, the experience of discomfort will vary from one person to another. If you are concerned about procedural pain, it’s important to let your clinician know, so they can tailor pain management strategies to your needs.
Have questions? We're here to help.
Get in touch and we’ll get back to you with the answers you’re looking for.
Cosmetic reversal is a non-surgical approach to correct or adjust the results of previous cosmetic treatments. It aims to give balance and address unwanted effects.
Cosmetic reversal works by carefully undoing or softening the effects of previous treatments. Using targeted, non-surgical techniques, clinicians achieve balance and correct results while preserving the health of your skin and underlying tissues.
New treatments can usually be considered once your previous work has been fully addressed and any swelling or side effects have settled, typically after 1-2 weeks. Your clinician will assess your healing and discuss the ideal timing for your next treatment.
People choose cosmetic reversal when they’re unhappy with the results of previous treatments, experience unwanted side effects, or want to return to their original appearance.
Cosmetic reversal is performed using various targeted, non-surgical techniques to correct or balance previous treatments. Your clinician will assess the area, discuss your goals, and apply the appropriate treatment. Treatments may involve dissolving, diluting, or prescribing certain medications, depending on the issue at hand.
The number of treatments required depends on the extent of your previous cosmetic work and your individual response. Some people may see results after a single session, while others may need a few appointments to achieve the desired correction, all guided by your clinician’s personalised plan.
The cost of cosmetic reversal treatment varies depending on your individual needs, which can only be determined after an assessment. If you’d like pricing information, you can:
- Complete our free online suitability assessment for general pricing information.
- Schedule a consultation (free spots available in Sydney) for a personalised treatment plan and quote.
The amount of treatment needed varies depending on the type, amount, and location of your previous cosmetic work. Your clinician will assess your individual situation during a personalised consultation and recommend a plan.
Most cosmetic reversal treatments are well-tolerated, with only mild discomfort during the procedure. However, because experiences always vary, we take a number of precautions to minimise any discomfort you may experience.
Cosmetic reversal treatments are usually quick, often taking just a few minutes to half an hour depending on the area and complexity. Your clinician will provide a personalised estimate during your consultation.
When having previous cosmetic treatments reversed, you can expect a personalised approach focused on addressing your concerns. Most patients experience mild, temporary swelling or tenderness immediately after the procedure, with results gradually becoming apparent as the area settles.
Pain during cosmetic reversal is usually mild, but can be minimised with simple measures. Our clinicians use careful, precise techniques, sometimes combined with topical numbing or ice, to keep you comfortable throughout the procedure. After treatment, over-the-counter pain relief and gentle care can help ease any residual discomfort.
Cosmetic reversal treatments typically start working either immediately, or within a few days, depending on the method used, with noticeable changes appearing as swelling subsides. Full results are usually visible within one to two weeks, depending on the area treated and your individual response.
Results from cosmetic reversal treatments can often be seen quickly, sometimes immediately or within a few days, as swelling settles and the treated area begins to adjust. The final outcome is usually evident within a couple of weeks, once the tissues have fully responded and settled.
Cosmetic reversal treatments are carefully designed to address previous concerns, without making your appearance worse. You may notice temporary swelling or mild changes immediately after the procedure, but the final result is tailored to achieve a natural, harmonious look.
It’s important to keep in mind that if you’ve had treatments over a long period, reversing them may reveal the natural ageing process. This isn’t caused by the reversal itself, but rather reflects the gradual loss of the effects provided by your previous treatments.
Some mild bruising or swelling can occur after cosmetic reversal treatment, but it is usually temporary and resolves within a few days. You can use a cold compress to minimise bruising and manage any discomfort to ensure a smooth recovery.
Yes, when carried out by qualified, experienced clinicians, reversing cosmetic treatments is generally low-risk. The procedures are minimally invasive and carefully tailored to your individual anatomy, minimising risk while aiming to address unwanted or unexpected results. As with any medical procedure, there are risks, and following professional guidance before and after treatment helps ensure the best outcomes.
When performed by experienced clinicians, cosmetic reversal treatments are designed to be low risk and generally do not cause lasting damage to your natural tissue or skin. Mild temporary reactions like redness or tenderness may occur, but the underlying structures usually remain intact.
Common side effects of cosmetic reversal treatments can include redness, swelling, bruising, or tenderness at the treatment site. Less commonly, some patients may experience temporary unevenness or sensitivity, which typically resolves as the area heals.
Why people choose Cosmetic Connection
Your treatment is performed in doctor-led, medical-grade clinics that follow strict safety and hygiene protocols, ensuring your privacy, comfort and wellbeing at every step.
We use only scientifically validated products, techniques and technologies — never trends or unproven methods — so you receive care you can trust.
Our clinicians stay up-to-date with best practice to deliver precise treatments and optimal results.
We prioritise what’s right for you. With us, you’ll receive personalised treatment recommendations–without any pressure or obligation to proceed with treatment.
With our standardised photography, we can plan your treatment collaboratively, while tracking your progress and results.
Your treatment plan is designed around your individual goals with tiered package pricing that provides greater value when addressing multiple concerns—helping you achieve better personalised results, more efficiently.
Your satisfaction is one of our top priorities.
We back our treatments with guarantees because we’re confident in our results — and we want you to feel completely supported and reassured in your decision to move forward.