Crow’s feet are the fine to deep lines that form at the outer corners of the eyes. They are among the earliest visible signs of facial ageing and one of the most commonly treated concerns in cosmetic medicine. The right treatment depends on whether your lines appear with movement, at rest, or both — and that distinction changes what’s actually going to work.
This guide covers everything you need to know: what crow’s feet are, what causes them, the full range of treatment options, how to assess suitability, and what realistic results look like. If you’ve been researching this topic and finding more noise than clarity, this is the resource designed to cut through it.
Quick answer: Muscle-relaxing treatments are the first-line treatment for crow’s feet that appear with movement. For lines visible at rest, volume-restoring treatments are more appropriate. Many people benefit from a combination of both approaches, depending on the nature of their lines. The right treatment can only be confirmed through a clinical assessment — there is no single answer that applies to everyone.
What are crow’s feet?
Crow’s feet — also called lateral canthal lines or periorbital rhytides in clinical settings — are the lines that radiate outward from the outer corner of the eye. They range from fine, barely visible creases that appear only when smiling, through to deeper, etched lines that are visible even when the face is completely at rest.
The name comes from the appearance of the lines, which resemble the spread of a bird’s foot when fully expressed. They are a universal aspect of facial ageing, present to varying degrees in virtually everyone over the age of 30.
Clinically, crow’s feet are classified as dynamic (present only with movement), static (present at rest), or mixed. This classification is central to treatment planning. According to the Glogau skin wrinkle classification — a standard framework used in cosmetic medicine since the 1990s — periorbital wrinkling progresses through four stages tied to increasing skin damage and line permanence.
What causes crow’s feet?
The primary cause is the repeated contraction of the orbicularis oculi — the muscle that encircles the eye and controls blinking, squinting, and the natural eye movement that occurs with smiling. Every contraction creates a folding action in the overlying skin. Over time, and as the skin’s collagen and elastin decline, these folds become permanent.
Contributing factors include:
- Age-related collagen loss — skin becomes thinner and less resilient from the mid-20s onward, meaning it recovers less well from repeated movement
- Sun exposure — UV radiation accelerates collagen breakdown and photodamage; this is particularly relevant in Australia where UV Index levels are among the highest globally, according to the Australian Radiation Protection and Nuclear Safety Agency (ARPANSA)
- Dehydration — chronically dehydrated skin shows lines more readily, particularly in the thin periorbital area
- Genetics — skin thickness, fat distribution, and the pattern of ageing are partly inherited
- Sleeping position — side sleeping creates compression-based lines that can compound movement lines over time
- Smoking — accelerates collagen degradation and produces characteristic perioral and periorbital wrinkling
Understanding what’s driving your crow’s feet matters because some of these factors are addressable with treatment and some require lifestyle changes. In our experience, patients who address UV protection and skin hydration alongside clinical treatment get better results and maintain them longer.
Who gets crow’s feet — and when?
Crow’s feet are one of the most democratically distributed signs of facial ageing. They are not a sign of neglect or unhealthy lifestyle — they are a natural consequence of an expressive face and time.
Dynamic crow’s feet typically first appear in the late 20s to early 30s for most people. They are often one of the first signs of facial ageing that people notice, precisely because the periorbital skin is some of the thinnest on the face. Static lines — visible at rest — tend to develop through the 30s and 40s as the dynamic lines become progressively deeper and etched.
People with very expressive faces, those with extensive sun exposure history, and those with naturally thinner periorbital skin tend to develop crow’s feet earlier. People who seek treatment earlier — while lines are still predominantly dynamic — generally achieve results more easily and with less intervention than those who wait until lines are deeply set.
We see patients across a wide age range for crow’s feet treatment. At the earlier end, the goal is typically prevention and maintenance. At the later end, it’s softening and restoration. Both are valid and achievable.
Treatment options for crow’s feet
There are three primary clinical treatment approaches for crow’s feet, each addressing a different aspect of the problem. A full comparison of each option — including who each suits, duration of results, and the clinical evidence behind them — is covered in detail in crow’s feet treatment options compared: what actually works.
In summary:
- Muscle-relaxing treatgments — the first-line treatment for dynamic crow’s feet. Temporarily reduces muscle activity to soften lines that appear with movement. Results last 3–4 months. Most widely used and best-evidenced approach.
- Volume-restoring treatments — addresses static lines by adding structural support beneath the skin. Best suited to lines visible at rest. Often used alongside muscle-relaxing treatment in the same session.
The crow’s feet treatment service page covers the clinical approach we take at Cosmetic Connection, including how we structure treatment planning across these options.
Can crow’s feet be treated with skincare alone?
Topical products can slow the development of crow’s feet and support overall skin quality. For very early, superficial dynamic lines, a consistent retinoid and SPF regimen may produce some visible improvement. However, once lines have a static component — visible when the face is completely relaxed — topical products cannot address the underlying structural change.
Daily broad-spectrum SPF is the single most important preventative skincare habit for periorbital ageing. It is non-negotiable in an Australian context. Beyond that, medical-grade retinoids, peptides, and antioxidants all have supporting evidence for maintaining skin quality, though they are adjuncts to treatment rather than alternatives.
In practice, we recommend skincare as part of every treatment plan — not instead of it. Patients who support their clinical treatment with appropriate skincare maintain results longer and require less intervention over time.
What does crow’s feet treatment look like at Cosmetic Connection?
Our approach to crow’s feet treatment starts with a full facial assessment, not a treatment assumption. The reason is that crow’s feet rarely exist in isolation — they are part of a broader pattern of periorbital and midface change that needs to be understood as a whole before any treatment plan is confirmed.
We assess the type and severity of your lines, the quality of the periorbital skin, the degree of any volume change, and the relationship between the crow’s feet and adjacent structures including the under-eye area and cheek.
From that assessment, we recommend the treatment or combination of treatments most appropriate for your situation — not the most intervention, and not the least. Our flat-fee pricing model means treatment recommendations are driven by clinical rationale, not by revenue optimisation. You can review how our pricing works on the flat-fee services page.
To understand the full treatment journey from first consultation through to aftercare, the patient journey page walks through what to expect at each stage.
If you’re ready to find out which approach suits your situation, the next step is to get started. Tell us what you’re hoping to achieve and we’ll build from there.
Crow’s feet treatment results: what to realistically expect
Realistic expectations are the foundation of a satisfying result. What treatment can achieve depends on the type and severity of crow’s feet, the approach used, and the individual’s skin quality and anatomy.
For predominantly dynamic crow’s feet treated with muscle-relaxing treatments, the typical result is a significant softening of lines with movement and a partial improvement of any early static lines. Lines do not disappear completely in most cases, particularly where there is already a resting component. What changes is the depth and prominence — the lines become less visible and less distracting.
For static lines treated with volume restoration, the improvement is often more dramatic in terms of the resting appearance, but the treatment does not affect dynamic movement. Combined approaches typically produce the most comprehensive improvement.
Results are temporary. Maintenance treatment is required to sustain the outcome. The frequency of maintenance varies between patients and treatment types. Most people settle into a treatment rhythm that works for their anatomy and goals over the first 12–18 months of treatment.
Before and after examples, with clinical context for each result, are covered in the crow’s feet before and after: realistic results post.
How much does crow’s feet treatment cost in Australia?
Crow’s feet treatment cost in Australia varies depending on the type of treatment, the amount of product used, and the clinic. A detailed breakdown of current pricing, including how Cosmetic Connection’s flat-fee model differs from per-unit pricing, is covered in the crow’s feet treatment cost post.
As a guide, muscle-relaxing treatment for crow’s feet is typically among the more accessible entry points in cosmetic medicine. Volume-restoring and collagen-stimulating treatments are priced differently based on product used and treatment extent.
[ctaForm]
Frequently asked questions
At what age should I consider crow’s feet treatment?
There is no fixed age. Treatment is appropriate when crow’s feet are causing you concern — for some people that’s in their late 20s, for others their 40s or 50s. Earlier treatment tends to require less intervention, but treatment at any stage can produce meaningful improvement. Suitability is determined by your anatomy, not your age.
How long do crow’s feet treatments last?
Duration varies by treatment type. Muscle-relaxing treatments typically last 3–4 months. Volume-restoring treatment lasts 9–18 months depending on the product and individual factors. Collagen-stimulating treatment produces results that build over months and can persist for 12–24 months.
Is crow’s feet treatment painful?
Most patients describe the sensation as mild and brief. The periorbital area is relatively sensitive compared to other treatment zones, but topical numbing cream is routinely applied prior to treatment to minimise discomfort. The procedure itself takes a matter of minutes.
What is the downtime for crow’s feet treatment?
Downtime is minimal. Muscle-relaxing treatments carry a risk of small marks that typically resolve within hours. Volume-restoring treatment may cause some localised swelling or bruising for a few days. Most patients return to normal activities the same day.
Can crow’s feet treatment be reversed?
Muscle-relaxing treatments wear off naturally over time and do not require reversal. Volume-restoring treatments using hyaluronic acid-based products can be dissolved with an enzyme if needed. Collagen-stimulating treatments are not reversible — they work by stimulating the body’s own tissue, so results gradually diminish naturally rather than requiring removal.
Do crow’s feet come back after treatment?
Yes — all current non-surgical treatments are temporary. Lines will return as treatment wears off. Many patients find that consistent treatment over time leads to a progressive improvement in their resting lines, as repeated muscle relaxation reduces the ongoing folding action that deepens static lines. Maintenance is part of the long-term plan.
Upper eyelid exposure refers to how much of the upper eyelid is visible between the lower edge of the brow and the upper lash line. More exposure is not inherently a problem — but when volume loss beneath the brow creates a hollow, concave quality to the eyelid, that exposed area can look sunken, shadowed, or skeletal rather than defined and full. This article explains what upper eyelid exposure actually means, what determines how much you have, and when non-surgical volume restoration is the appropriate response.
Quick answer: Upper eyelid exposure is the visible portion of the upper eyelid between the brow and the lashes. High exposure with good underlying volume reads as defined and youthful. High exposure with volume loss reads as hollow, aged, or fatigued — a condition known as the A-frame deformity or upper eyelid hollowing. Non-surgical volume restoration addresses the hollowing without altering the amount of exposure itself.
What does upper eyelid exposure actually mean?
Upper eyelid exposure is simply a measurement — the vertical distance of visible upper eyelid between the brow and the upper lash line. Aesthetically, it matters because it influences how the eye reads: how large, how open, how youthful, how defined.
There is no single ideal amount of upper eyelid exposure. Preferences vary significantly across cultural contexts, facial proportions, and individual aesthetics. What matters more than the measurement is what the exposed area looks like — and whether the eyelid beneath the brow has the volume and fullness to support an attractive appearance.
The concern most people are describing when they search for information about upper eyelid exposure is not actually about the amount of exposure itself. It is about what that exposed area reveals: a hollow, deflated, or sunken quality that makes the eye look tired, recessed, or older than it should. That hollow is upper eyelid volume loss — and the two concerns, while related, are different problems requiring different solutions.
What causes upper eyelid hollowing beneath visible exposure?
Upper eyelid hollowing beneath visible exposure has three primary causes.
Volume loss through ageing. A 2025 study published in the Journal of Cosmetic Medicine confirms that sunken eyelids result from the loss of orbital fat, atrophy of retro-orbicularis oculi fat (ROOF), and deficits in superficial dermal layers — with periocular support weakening and fat pad atrophy occurring progressively with age. This process typically begins in the mid-twenties and accelerates with each decade.
Genetics. A periorbital anatomy review published on PubMed Central notes that supraorbital hollowness can result from genetic factors, with this condition particularly prevalent in certain ethnic groups due to anatomical differences including weaker levator muscles and unique fat distribution patterns. For people in this group, the hollowed appearance may have been present since their teens or twenties.
Previous surgery. Over-resection of fat during blepharoplasty can produce an A-frame deformity or hollowed upper lid appearance. This is one of the clearest indications for non-surgical upper eyelid volume restoration, as it addresses directly what the surgery inadvertently created.
Is high upper eyelid exposure a problem?
Not inherently. Upper eyelid exposure exists on a spectrum, and where you sit on that spectrum is largely determined by your anatomy — brow height, orbital shape, and the position of your upper eyelid crease. None of these are problems in themselves.
The point at which upper eyelid exposure becomes a cosmetic concern is when the exposed area looks hollow rather than full — when the space beneath the brow reads as deflated or concave rather than smooth and supported. This is the A-frame deformity, and it is a volume problem, not an exposure problem. Addressing it requires restoring volume, not reducing exposure.
Conversely, some people have very low upper eyelid exposure — the brow sits close to the lash line and the eye appears heavy or hooded. This is a different concern entirely, and one that non-surgical volume restoration does not address. If low exposure or a hooded appearance is the primary concern, the appropriate assessment involves brow positioning or surgical options. You can read a detailed breakdown of the treatment options in our guide to upper eyelid volume restoration vs surgery .
How to fix upper eyelid hollowing non-surgically
When the underlying concern is volume loss — a deflated, hollow, or sunken quality to the upper eyelid — non-surgical volume restoration is a well-established and effective option.
Treatment involves placing a small amount of hyaluronic acid gel into the hollow space beneath the brow bone at the level of the bone itself. A technique paper available via ResearchGate describes placement at the preperiosteal level in small aliquot threads as restoring the smooth curve of the upper periorbital rim, giving a softer and more aesthetically pleasing appearance. The volumes used are small — a 2025 cohort study in the Journal of Cosmetic Medicine found an average of 0.8 cm³ per upper eyelid across 235 treated eyelids, with excellent patient satisfaction at over one year of follow-up.
Treatment takes 15–30 minutes. A topical anaesthetic is applied beforehand. Most people return to their normal routine the same day, though bruising and mild swelling around the eye area is common for several days afterward. Final results settle over 2–4 weeks.
Results typically last 12–18 months before a maintenance appointment is needed. For most people, the change is subtle and natural — others notice the eyes look more rested and open, but rarely identify specifically what has changed.
You can read the full clinical picture — including risks, candidacy, and costs — in our complete guide to upper eyelid volume loss and treatment.
If you are unsure whether volume loss or another factor is driving your upper eyelid concern, a consultation is the right starting point — not a treatment plan. Book with us: our doctors will give you an honest picture of what is causing your concern before any treatment is discussed.
[ctaForm]
What upper eyelid exposure treatment cannot fix
It is worth being direct about the limits of non-surgical volume restoration, because the wrong treatment for the wrong concern produces poor results regardless of how well it is performed.
Non-surgical upper eyelid volume restoration does not:
- Remove excess or overhanging upper eyelid skin — if skin redundancy is the primary issue, surgery is the appropriate path
- Lift a drooping brow — brow descent requires either targeted treatment to the brow position or surgical correction
- Change the structural amount of upper eyelid exposure — it restores volume beneath that exposure, but does not alter how much of the lid is visible
- Address functional eyelid problems — impaired vision from heavy upper lids requires a surgical assessment
In our experience, one of the most common presentations is someone who has identified upper eyelid exposure as their concern but whose actual issue is a combination of factors — brow position, volume, skin quality, and midface descent all contributing to a tired or aged appearance around the eye. Treating one in isolation without assessing the others rarely produces the result the person was hoping for.
Frequently asked questions
What is the ideal amount of upper eyelid exposure?
There is no universal ideal. Upper eyelid exposure varies significantly across individuals, ethnicities, and aesthetic preferences. What matters more than the measurement is whether the exposed eyelid area has the volume and fullness to support an attractive appearance. A hollow, deflated lid with high exposure reads very differently to a full, supported lid with the same amount of exposure.
Can you reduce upper eyelid exposure without surgery?
Reducing the structural amount of upper eyelid exposure — changing how much lid is visible — is not what non-surgical volume restoration addresses. What it can do is change how that exposed area looks by restoring the fullness and curve beneath the brow. For those seeking hunter eyes — a specific aesthetic characterised by defined, almond-shaped eyes with a particular upper eyelid structure — you can read our dedicated guide to hunter eyes .
What is the A-frame deformity?
The A-frame deformity is a clinical term for upper eyelid hollowing where the brow bone and lid create a concave, triangular shadow between them when viewed from the front. It can develop through ageing, genetics, or over-aggressive fat removal during blepharoplasty.
Is upper eyelid hollowing treatment safe?
It carries a higher risk profile than most non-surgical facial treatments due to the complex anatomy around the eye. According to data cited in Ophthalmology Times, the incidence of vascular complications with hyaluronic acid treatments is approximately 0.01%–0.05% per treatment. Choosing a doctor with specific periorbital training who carries emergency reversal agents in clinic is essential.
How long does upper eyelid hollowing treatment last?
Most people see results lasting 12–18 months. The periorbital area has less muscular activity than most other treatment sites, which tends to mean slower breakdown of hyaluronic acid. Individual variation in metabolism, the volume placed, and the product used all influence duration.
What does upper eyelid hollowing treatment cost in Australia?
Uupper eyelid volume restoration is priced between $1,500 and $3,000. With us pricing is flat-fee — no add-ons once treatment is planned. Read more about how our pricing works.
Upper eyelid volume loss creates a hollow, sunken appearance beneath the brow bone that reads as fatigue, premature ageing, or a drawn, skeletal quality around the eyes. Non-surgical treatments restore that lost volume, rebuilding the smooth curve that defined the upper eyelid before volume was lost, or that is naturally deficient.
This guide covers everything you need to understand about upper eyelid volume restoration: what causes hollowing, how treatment works, who it suits, what the risks are, what results look like, how long they last, and what it costs in Australia.
Quick answer: Upper eyelid hollowing — also called the A-frame deformity or sunken superior sulcus — occurs when volume beneath the brow bone is lost through ageing, genetics, or previous surgery. Non-surgical volume restoration rebuilds the natural curve of the upper eyelid. Results typically last 12–18 months. The periorbital area carries higher anatomical risk than most injection sites, making doctor-led treatment essential.
What is upper eyelid volume loss?
The upper eyelid occupies a space defined by the brow bone above and the eyelid itself below. In a full, youthful upper eyelid, there is a smooth, gently curved transition between the brow and the lid. When volume in this space reduces — through fat pad thinning, bone resorption, or soft tissue descent — the area becomes concave. The result is a shadow or sunken appearance that can make eyes look smaller, more aged, or persistently fatigued.
This condition is known clinically by several interchangeable terms. According to a 2022 paper published in the Journal of Drugs in Dermatology, it may be referred to as an A-frame deformity, superior sulcus syndrome, upper eyelid hollowing, sunken superior sulcus, or sunken upper eyelid. The A-frame name describes what you see from the front: the brow forms the top of the triangle, and the concave hollow beneath forms the space inside it.
Upper eyelid volume loss is not only an ageing concern. Some people carry a genetic predisposition to a more hollowed upper lid from early adulthood. Others develop it following upper eyelid surgery where fat was removed too aggressively. Understanding the cause matters because it determines whether non-surgical treatment is appropriate and what result is realistic.
What causes upper eyelid hollowing?
There are three primary causes, and they sometimes overlap.
Ageing. A review published in PMC (National Library of Medicine) confirms that changes in the upper eyelid region with age include brow descent, unmasking of the medial fat pad, and progressive exposure of the superior orbital rim — all driven by the gradual thinning and descent of fat pads, reduced soft tissue support, and bone resorption that occurs across the face from the mid-twenties onward. The periocular area typically shows these changes earlier than other facial regions.
Genetics. A review published in PMC covering periorbital filler anatomy and technique notes that supraorbital hollowness can result from genetic factors, and is particularly prevalent in East Asian patients due to anatomical differences including weaker levator muscles and unique fat distribution patterns. For people in this group, hollowing may be present from a young age and is not a sign of premature ageing.
Post-surgical. Patients who have undergone upper blepharoplasty with aggressive fat removal can be left with an over-corrected, hollowed appearance. Caution is necessary during blepharoplasty to avoid over-resection of skin or fat, which can lead to an A-frame deformity or hollowed upper lid appearance. For people in this situation, non-surgical volume restoration methods are often the most direct correction available.
How non-surgical upper eyelid volume restoration works
Non-surgical upper eyelid volume restoration uses various methods to rebuild the curve that was lost.
The treatment takes 10–20 minutes in clinic. A injectable anaesthetic is applied beforehand and the product itself contains a local anaesthetic that reduces discomfort as treatment proceeds. Most people return to normal activities the same day, and bruising and mild swelling is uncommon. Final results are best assessed at 2–4 weeks once the area fully heals.
Is upper eyelid volume restoration safe?
This is the question we hear most often, and it deserves a direct answer.
According to a report published by Ophthalmology Times, citing Oxford Academic data, the incidence of vascular complications when administering hyaluronic acid treatments is between 0.01% and 0.05% per treatment. The periorbital area is anatomically complex with numerous vital structures and thin, delicate skin, making it more susceptible to bruising, swelling, and in rare cases vision impairment.
What reduces this risk substantially: deep anatomical knowledge, use of an appropriate product selected specifically for periorbital placement, small volumes, careful technique, and immediate access to the dissolving agent that can reverse treatment in the event of a vascular emergency. As noted by EyeWiki (American Academy of Ophthalmology), hyaluronic acid treatment in the periorbital region is considered off-label — its use in this area has not been formally approved by regulatory bodies, though clinical practice and published evidence support its use by appropriately trained practitioners.
At Cosmetic Connection, upper eyelid treatment is performed exclusively by doctors with specific training in periorbital anatomy. We carry reversal agents in clinic at all times and apply the same emergency protocol standards to all periorbital work. If you are comparing providers, asking about clinical background, emergency protocols, and periorbital experience specifically (how many treatments they have done) is entirely reasonable — any provider worth consulting will welcome those questions.
If your concern is genuine upper eyelid hollowing and you want to understand whether non-surgical volume restoration is appropriate for your situation, our team will give you an honest assessment before any treatment is planned. Book a consultation at any of our clinic locations.
Who is suitable for upper eyelid volume restoration?
Non-surgical upper eyelid volume restoration works well for a specific presentation. Getting this right at assessment is what separates a natural, satisfying result from a poor outcome — or an inappropriate treatment entirely.
You may be a suitable candidate if:
- You have genuine volume loss in the upper eyelid area — the hollow is caused by deflation, not excess skin or brow drooping
- The skin of your upper eyelid is in reasonable condition — very thin or crepey skin can increase the visibility of product at the surface
- You have realistic expectations — this treatment restores what was lost rather than creating a dramatically different appearance
- You have had previous blepharoplasty with an over-resected result — a well-established indication for non-surgical volume correction
Non-surgical upper eyelid volume restoration is not appropriate if:
- Your primary concern is excess or overhanging upper eyelid skin — volume restoration will not address this and may worsen the appearance
- Your brow sits low and creates the appearance of heaviness — the concern here is brow position, not volume
- You have a functional vision issue from heavy upper lids — this requires surgical assessment
In our experience, a proportion of people who enquire about upper eyelid volume restoration are better served by a different approach — brow repositioning, temple volume restoration, or a broader upper face assessment that considers all contributing factors together. An honest suitability assessment before any treatment is planned is the most valuable thing we offer. You can explore how we approach treatment planning in our guide to upper eyelid exposure and what causes it and our detailed comparison of non-surgical treatment and blepharoplasty .
[ctaForm]
How long do results last?
Most patients see results lasting 12–18 months, though this varies depending on individual metabolism, and the treatment details.
With repeat treatment over time, many patients find their results become more stable, consistent with what is observed across treatments generally as tissue quality gradually improves with repeated treatment. Your treating doctor will advise on maintenance timing based on how your result settles and what your goals are.
What does upper eyelid volume restoration cost in Australia?
Upper eyelid volume restoration in Australia is priced between $1,500 and $3,000, depending on the extent and complexity of treatment, and the skill and experience of the clinician.
We operate on flat-fee pricing — the fee quoted includes all product used in your treatment, with no per-unit add-ons once treatment has been planned. You can read more about how our pricing structure works and what flat-fee treatment means in practice.
If you are comparing costs across providers, the most important variable is not price — it is the clinical background of the person performing the treatment. Given the anatomical complexity and risk profile of periorbital treatment, this is not a decision to make on cost alone.
Frequently asked questions
Is upper eyelid volume restoration painful?
Most people find it very manageable. An injectable anaesthetic is applied beforehand and the product contains a local anaesthetic that reduces discomfort during treatment. The periorbital area can be more sensitive than other sites.
What is the A-frame deformity?
The A-frame deformity is a clinical term for upper eyelid hollowing where the brow bone and lid create a concave, triangular shadow between them when viewed from the front. It can develop through natural ageing, genetics, or as a result of over-aggressive fat removal during blepharoplasty surgery.
Can non-surgical upper eyelid treatment go wrong?
Yes — as with any periorbital treatment, there are real risks. Common issues include bruising, swelling, surface irregularities, and the Tyndall effect if product sits too superficially. More serious but rare complications include vascular compromise. Choosing a doctor with specific periorbital experience who carries reversal agent in clinic reduces this risk substantially.
How do I know if I need volume restoration or surgery?
The key question is whether your concern is primarily volume loss or excess skin. Genuine hollowing or deflation beneath the brow points toward non-surgical volume restoration. Excess overhanging skin, heavy lids, or brow drooping that affects vision points toward surgical assessment. You can read a detailed breakdown in our guide to upper eyelid treatment vs surgery .
Does non-surgical upper eyelid treatment look natural?
In appropriate candidates, yes. The goal is restoration — returning volume that was previously there, not augmentation. Very small volumes are used, typically under 1 mL per side, and deep placement means product is not visible at the surface.
Where can I get upper eyelid volume restoration in Australia?
Cosmetic Connection offers upper eyelid volume restoration at our clinics in Australia. All periorbital treatment is performed by doctors with specific training in periorbital anatomy and access to emergency reversal protocols.
Lip filler is one of the most searched cosmetic treatments treatments in Australia, and one of the most misunderstood. This educational guide covers the complete picture: what lip filler is, what hyaluronic acid is and how it works, what lip filler can and cannot achieve, how long results last, what the risks are, what it costs across Australia, how to get a natural result, and how to find a qualified provider. It is written as a comprehensive clinical reference for anyone researching this topic in depth.
Quick answer: Lip filler refers to the injection of a hyaluronic acid-based gel into and around the lips to add volume, improve shape, and enhance definition without surgery. Results are immediate, last 12 to 18 months, and are fully reversible using an enzyme called hyaluronidase. In Australia, lip filler is a prescription-only substance that must be administered under appropriate medical supervision.
What is lip filler?
Lip filler is the colloquial term for a cosmetic treatments procedure using a hyaluronic acid-based gel to modify the volume, shape, and definition of the lips. Hyaluronic acid (HA) is a naturally occurring glycosaminoglycan — a long-chain sugar molecule — found throughout the body’s connective tissue. When formulated as a cosmetic injectable, it is cross-linked through a chemical process that determines its density, elasticity, cohesivity, and longevity.
The formulation used for lip filler is specifically engineered for the lips: softer and more pliable than formulations used in structural areas like the nasal bridge or chin, because the lips are a high-movement area and a firmer product would feel unnatural and break down faster under the constant motion of speaking and eating.
Lip filler is also known as lip augmentation, lip injections, dermal filler for the lips, or hyaluronic acid lip filler. All refer to the same treatment category. It is distinct from the lip flip (a neuromodulator treatment to the orbicularis oris muscle that everts the upper lip without adding volume) and from PDO thread lip treatment, which uses dissolvable threads rather than gel.
For a broader overview of all non-surgical lip treatment categories — including Rejuran and PDO threads — see our comprehensive guide to non-surgical lip enhancement.
What lip filler can and cannot achieve
Lip filler works through the addition of volume. It does not remove tissue, alter muscle function, or structurally change bone or cartilage. This distinction defines both what it can and cannot achieve.
| Concern | Mechanism | Realistic outcome |
|---|---|---|
| Thin lips | Hyaluronic acid gel placed through the body of the lip adds volume | Meaningful, proportionate volume increase; improved lip-to-face balance |
| Undefined vermillion border | Precise placement at the lip edge creates definition | Sharper, more defined lip outline without significant volume addition |
| Lip asymmetry | Targeted volume to the smaller or flatter side | Meaningful correction of mild to moderate asymmetry |
| Age-related volume loss | Restores lost tissue volume and redrapes overlying skin | Refreshed, restored appearance |
| Downturned lip corners | Targeted placement at the oral commissures lifts the corner | Subtle but visible improvement in perceived resting expression |
| Flat cupid’s bow | Volume placed centrally defines the upper lip peaks | More pronounced upper lip architecture and definition |
| Vertical lip lines | Superficial placement softens perioral lines | Mild to moderate improvement; combination with neuromodulators often optimal |
What lip filler cannot achieve:
- Permanent volume increase
- Physical alteration of lip muscle or underlying oral anatomy
- Correction of significant structural asymmetry
- Improvement in lip skin pigmentation or colour
- Reduction in lip size — filler adds, it does not remove
How does lip filler work? The procedure step by step
- Consultation and assessment: the practitioner examines lip anatomy — volume distribution, upper-to-lower ratio, vermillion border, symmetry, and facial proportions — and discusses goals, realistic outcomes, and risks to determine suitability
- Treatment planning: injection points, product selection, and volume are mapped based on individual anatomy and goals
- Anaesthetic: numbing cream or injections are applied for approximately 10 minutes; most lip filler formulations also contain lidocaine within the product
- Injection: 5-15 minutes; multiple small injections placed at anatomically determined points using needle, cannula, or both
- Real-time assessment: symmetry and volume assessed from multiple angles; minor adjustments made during the procedure
- Aftercare and review: written aftercare provided; follow-up appointment scheduled
How long does lip filler last?
Lip filler results typically persist for 12 to 18 months. The lips break down hyaluronic acid filler faster than most other facial areas because of constant movement from speaking, eating, and facial expression.
| Factor | Effect on longevity |
|---|---|
| Product density and cross-link level | Higher density = longer duration |
| Volume administered | Higher volume = generally longer duration |
| Individual metabolism | Faster metabolism = shorter duration |
| Prior treatment history | Residual product from prior sessions extends effective longevity |
For a detailed breakdown of all factors affecting longevity, see our guide to how long lip enhancement results last.
Lip filler volumes: 0.5ml vs 1ml vs 2ml
Volume is the most commonly asked-about parameter before a first lip filler appointment. The volume numbers refer to the amount of hyaluronic acid gel administered in a single session, measured in millilitres.
| Volume | Best suited to | Typical outcome |
|---|---|---|
| 0.25ml | Very subtle first-time treatment | Very subtle texture improvement |
| 0.5ml | First-time patients with small lips; subtle enhancement | Minimal change |
| 1ml | Patients with thin lips; those building on prior treatment; specific shape goals | Meaningful, visible result; can look natural or noticeable depending on technique |
| 1.5ml–2ml | Volume restoration goals; significant asymmetry; experienced patients | Substantial change; requires experienced injector to maintain natural appearance |
For the complete guide to volume decision-making, see our detailed post on lip enhancement treatment volumes.
Lip filler techniques: Russian, classic, and more
The technique used to administer lip filler significantly influences the shape, distribution, and quality of the result. The main techniques used in Australian clinics are:
- Classic volumising: product distributed through the body of both lips for overall fullness
- Border definition: precise placement at the vermillion border for definition without significant volume
- Russian technique: vertical injection approach creating central height and projection; pronounced cupid’s bow; less lateral spread
- Cupid’s bow enhancement: targeted volume at the peaks of the upper lip
- Holistic peri-oral approach: multiple techniques tailored specifically to the entire lip region — most common in experienced hands
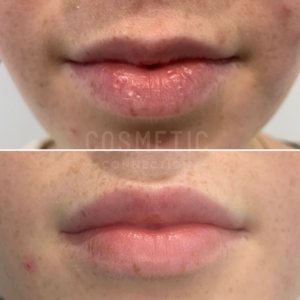
Before and after classic lip volume.
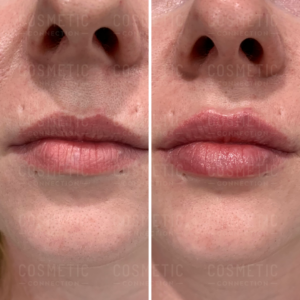
Before and after Cupid’s bow definition.
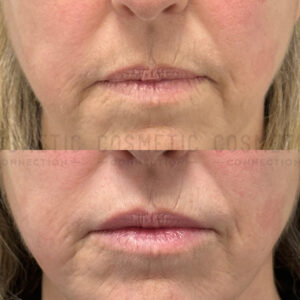
Results of a holistic peri-oral approach.
For a complete explanation of each technique, see our guide to lip enhancement techniques.
[ctaForm]
What are the risks of lip filler?
Lip filler is a medical procedure and carries real risks. The lips are a higher-risk site for injectable treatments due to the density of the labial vasculature. The superior and inferior labial arteries present specific vascular risk that practitioners performing lip filler must be trained to manage.
| Complication | Incidence | Management |
|---|---|---|
| Bruising | Common — 10–20% | Resolves 3–5 days |
| Swelling | Universal — expected | Peaks 24 hours; resolves 3–7 days |
| Asymmetry | Temporary — common; persistent — uncommon | Review at 2 weeks; correction or reversal |
| Lumps | Uncommon with correct technique | Review; massage or dissolution if persistent |
| Migration | Uncommon with conservative volumes | Dissolution and re-treatment |
| Infection | Rare | Antibiotics; medical review |
| Granuloma | Rare | Medical assessment; steroid or dissolution |
| Vascular occlusion | Rare — most serious | Immediate reversal; emergency management |
For the complete risk guide, see our post on lip enhancement risks and complications.
Is lip filler reversible?
Yes. Hyaluronic acid lip filler is fully reversible using an enzyme that catalyses the breakdown of the cross-linked gel. When injected into the treated area, dissolution is largely complete within 24 to 48 hours. The lips return to their natural pre-treatment baseline.
This reversibility distinguishes hyaluronic acid filler from permanent or semi-permanent alternatives — including PMMA, silicone, and calcium hydroxylapatite used off-label. None of these should be used in the lips; complications from these products cannot be reversed and have produced severe long-term outcomes in documented cases.

Before and after lip dissolving.
For the complete dissolution guide, see our post on reversing lip enhancement treatments.
How much does lip filler cost in Australia?
| Volume | National price range | Sydney | Melbourne |
|---|---|---|---|
| 0.5ml lip filler | $350 – $600 | $400 – $600 | $400 – $600 |
| 1ml lip filler | $500 – $950 | $550 – $950 | $500 – $950 |
Lip filler is not covered by Medicare or private health insurance. For a full pricing guide, see our post on lip enhancement costs in Australia.
What natural lip filler actually looks like
“Natural lip filler” is the most commonly searched term for people considering this treatment — and for good reason. Unnatural results are what most patients fear. The key insight is that unnatural results are almost always the product of excess volume and incorrect placement, not an inherent property of the treatment.
Natural-looking lip filler results share consistent characteristics: proportionate volume relative to the face, preserved natural lip shape, a defined but soft border, natural movement with expression, and an appropriate upper-to-lower lip ratio with the lower lip remaining fuller than the upper.
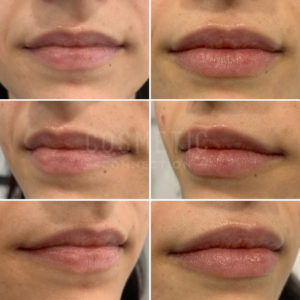
Before and after natural lip injections.
For the complete guide, see our post on what natural lip enhancement actually looks like.
How big will my lips be after treatment?
This depends on your starting size, and the amount and type of treatment you have. Most people notice a subtle change with their first session. In the first few days after, the swelling will allow you to experience a bigger change: if you like the swelling, then consider an additional session. If the swelling is too much change for you, allow it to settle and switch to maintenacne.
Lip filler swelling: day-by-day timeline
Swelling after lip filler is expected and temporary. It peaks at 24 to 48 hours and resolves progressively over 3 to 7 days. The final result is visible at 2-4 weeks after the product integrates. Do not assess or judge the result before the 2-week mark.
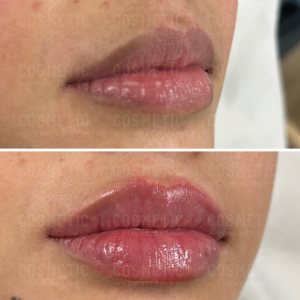
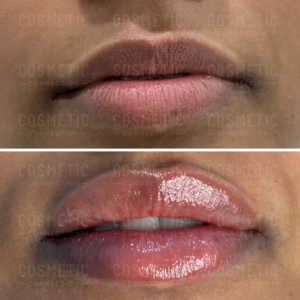
Before and immediately after lip treatment demonstrating initial swelling.
For the complete day-by-day breakdown, see our guide to swelling after lip enhancement treatments.
Lip filler aftercare
In the first 24 hours: avoid exercise, alcohol, heat, and direct pressure on the lips. In the first 2 weeks: avoid dental procedures requiring lip retraction, high-impact exercise, and facial treatments applying pressure to the lip area. Attend your 2-week review appointment. For the complete aftercare guide, see our post on lip filler aftercare.
Lip filler migration: causes and prevention
Lip filler migration occurs when hyaluronic acid gel moves above the natural lip border into the perioral tissue. It is caused primarily by excessive accumulated volume over time and incorrect injection depth. It is uncommon with conservative volumes and correct technique, and is fully reversible with dissolution. For the complete guide, see our post on lip filler migration.
Who performs lip filler in Australia?
In Australia, lip filler is a prescription-only substance regulated by the TGA. It must be prescribed by a registered medical practitioner and administered under appropriate clinical supervision. Under AHPRA guidelines updated in 2023, a doctor-led model — where a registered doctor is responsible for each patient’s clinical assessment and treatment plan — is the expected standard of care.
Cosmetic Connection operates doctor-led lip filler services at its St Leonards, Sydney and Toorak, Melbourne clinics. Every treatment plan is developed by a registered doctor using a suitability-first approach. Flat-fee pricing applies across all treatments.
Lip filler in Sydney and Melbourne
For location-specific guidance on finding a qualified lip filler provider, see our dedicated posts on lip enhancement in Sydney and lip enhancement in Melbourne.
Common myths about lip fillers
Myth 1: “Lip filler will permanently stretch out your skin”
The Reality: When well-administered in conservative amounts, the treatment slowly metabolises over 12 to 18 months. As it breaks down, the skin naturally snaps back to its original baseline. There is no clinical evidence that proper lip treatments leave the lips looking deflated or stretched out once the product wears off.
Myth 2: “Getting lip filler always results in ‘duck lips'”
The Reality: An unnatural, over-projected look (often called “duck lips”) is the result of poor technique, excessive product volume, or filler migrating due to improper depth. It is not an inherent trait of the treatment itself. When placed accurately by an experienced injector using an appropriate upper-to-lower lip ratio, lip filler remains soft, flat, and completely proportionate to the rest of your facial features.
Myth 3: “If you don’t like it, you just have to wait a year for it to go away”
The Reality: You are never stuck with a result you do not want. Because modern lip fillers are made from hyaluronic acid, they are fully and rapidly reversible. By injecting a targeted dissolving enzyme, the gel can be dissolved easily, returning your lips to their natural pre-treatment baseline within 24 to 48 hours.
Myth 4: “Lip filler and a lip flip are the exact same thing”
The Reality: While both target the lips, they use entirely different mechanisms. Lip filler uses a physical gel to add volume, structural shape, and definition. A lip flip temporarily relaxes the muscle around the mouth, allowing the top lip to gently roll outward. A lip flip changes the illusion of the lip height when speaking and smiling without adding any actual volume.
Frequently asked questions
What is the difference between lip filler and the lip flip?
Lip filler uses hyaluronic acid gel to add volume and shape to the lips. The lip flip uses a small amount of neuromodulator injected into the orbicularis oris muscle to relax the upper lip and cause it to evert slightly — creating the appearance of a fuller upper lip without adding volume. The lip flip produces a more subtle result and lasts 6 to 8 weeks. Both can be combined.
How long does 0.5ml lip filler last?
0.5ml lip filler typically lasts 9 to 12 months. Lower volumes break down faster than higher volumes in absolute terms, because there is less product to metabolise. Individual metabolism, product type, and lip movement patterns also affect duration.
Can lip filler look natural?
Yes, when performed with the right volume and technique for the individual anatomy. Natural-looking results are the norm in well-governed clinical practice. Unnatural results are the product of excess volume and incorrect placement, not of the treatment itself.
What is the Russian lip filler technique?
The Russian technique uses a vertical injection approach that creates central projection and height in the upper lip, producing a pronounced cupid’s bow and heart-shaped appearance with less lateral spread. It requires advanced training and is not anatomically appropriate for every patient. Assessment by an experienced practitioner is necessary before this technique is recommended.
Does lip filler hurt?
Most patients find lip filler manageable. Topical numbing cream is applied before treatment, and most lip filler formulations contain lidocaine — a local anaesthetic — within the product. The procedure takes 10 to 20 minutes. Mild tenderness in the first 24 to 48 hours post-treatment is common.
Can I get lip filler while pregnant or breastfeeding?
No. Lip filler is contraindicated during pregnancy and breastfeeding. There is no safety data for hyaluronic acid injectable treatments during either period. Responsible clinics will not perform lip filler on patients who are pregnant or breastfeeding.
What happens if I stop getting lip filler?
The hyaluronic acid breaks down naturally over 12 to 18 months. If treatment is discontinued, the lips return progressively toward their natural baseline as the product metabolises. There is no credible clinical evidence that well-administered lip filler causes permanent negative structural change to the lips over the long term.
How soon before a wedding or event should I get lip filler?
Schedule a first lip filler treatment at least 2 months before an event. This allows 4 weeks for settling, and a follow-up at 4 weeks with enough time for an adjustment or touch-up if needed. Do not have a first lip filler treatment within 4 weeks of an important event.
Can you get lip fillers if you suffer from cold sores?
Yes, as long as you don’t currently have active cold sores (HSV), you can get lip fillers.
What is lip filler dissolving and when is it done?
Lip filler dissolving uses hyaluronidase to break down the hyaluronic acid gel and return the lips to their natural baseline. It is used for emergency vascular management, aesthetic correction of unsatisfactory results, and pre-treatment clearance of accumulated product. Results are visible within 24 to 48 hours. See our full guide to reversing lip enhancement treatments.
How do I make lip fillers last longer?
The three proven ways to make lip fillers last longer are to have higher volumes, use a more cohesive (thicker) filler, and have consistent maintenance. All methods increase the time it takes for your body to break down the filler. No other methods are proven to increase lip filler longevity.
What happens when lip fillers wear off?
When lip fillers wear off, your lips revert to their natural shape and size.
How long to wait between lip filler treatments?
It depends. When building your result, you may need a few sessions in a short period of time, typically over 2-3 months. For maintenance, 1 treatment per year is usually sufficient.
How do I find a good lip filler provider in Australia?
Confirm a registered doctor is involved in your clinical assessment, hyaluronidase is on-site at every appointment, a genuine consultation precedes treatment, pricing is transparent and flat, and a 2-week follow-up review is included. For Sydney-specific guidance, see our post on lip enhancement in Sydney. For Melbourne, see our post on lip enhancement in Melbourne.
Reversal of cosmetic lip enhancement is one of the most important safety features of the treatment category, and one of the least well understood. This guide explains when and why reversal is performed, what the procedure involves, what to expect during and after dissolution, and how to plan re-treatment once the area has settled.
Quick answer: Volume-restoring lip treatments can be fully reversed using an enzyme. Results of dissolution are visible within 24 to 48 hours and the lips return to their natural baseline. Reversal is used for emergency vascular management, aesthetic correction, and pre-treatment clearance of prior product. PDO thread and Rejuran treatments are not reversible in the same way.
Why reversal is performed
There are three distinct clinical contexts in which reversal of cosmetic lip treatment is appropriate:
- Emergency reversal: in the event of vascular occlusion — where the substance enters or compresses a blood vessel — immediate administration of a reversal agent is the primary management. Time is critical; delayed reversal significantly increases the risk of permanent tissue damage. This is the most urgent context and should be treated as a medical emergency.
- Aesthetic reversal: if a patient is unhappy with the result of treatment, whether due to volume, shape, asymmetry, or migration, elective reversal returns the lips to their pre-treatment baseline. After full dissolution and a settling period, new treatment can be planned with a corrected approach.
- Pre-treatment clearance: patients who present with significant accumulated product from prior providers, particularly where migration has occurred or where the anatomy cannot be reliably assessed through existing product, may require dissolution before new treatment can be appropriately planned.
What hyaluronidase does
Hyaluronidase is a naturally occurring enzyme that catalyses the breakdown of hyaluronic acid. Synthetic derivatives are used to break down the product used in cosmetic treatments. When placed into the treated area, it disrupts the structural bonds of the gel, causing it to break down rapidly and be reabsorbed by the surrounding tissue. The result is visible within hours and largely complete within 24 to 48 hours.
The reversing agen also acts on naturally occurring hyaluronic acid in the surrounding tissue. This is why there can be a brief period of looking “worse than baseline” immediately after dissolution before the tissue normalises. This typically resolves within a few days.
What happens during a dissolution appointment
- Assessment: the practitioner evaluates the existing product including its location, volume, and distribution to determine appropriate dose and placement
- Treatment: The reversal agent is placed into the same areas where the original product was placed; the procedure takes 5 to 15 minutes
- Immediate observation: some reduction in volume is typically visible immediately; full effect is seen at 24 to 48 hours
- Review: a follow-up assessment at 48 to 72 hours allows confirmation that dissolution is complete; additional hyaluronidase may be needed if residual product remains
Before and after lip dissolving.
What to expect after dissolution
| Timeframe | What to expect |
|---|---|
| Immediately after | Some redness, swelling, and tenderness at treatment sites; some volume reduction visible immediately |
| Hours 2–12 | Volume reduces progressively; lips may appear slightly deflated relative to baseline as the enzyme also acts on surrounding natural tissue |
| 24–48 hours | Most dissolution complete; lips approaching or at their natural baseline |
| 3–5 days | Any temporary effect on natural tissue resolves; lips at true natural baseline |
| 2–4 weeks | Appropriate window for reassessment and new treatment planning |
Re-treatment after dissolution
Most patients can receive new treatment 2 to 4 weeks after dissolution, once the tissue has fully settled and the natural baseline anatomy is clear. Attempting re-treatment too soon, before the dissolving enzyme has fully cleared and the tissue has normalised, risks interaction between residual dissolver and the new product.
Re-treatment after dissolution is an opportunity to approach the anatomy correctly from the outset. A thorough consultation, conservative volume, correct technique, and a 2-week review plan all contribute to a better outcome after dissolution than was achieved in the original treatment.
If you’re interested in improving the appearance of your lips and want to understand your options, request a consultation with our clinical team. We’ll assess your lips using our 3 pillar framework, and provide fair, honest guidance.
[ctaForm]
Frequently asked questions
Does dissolution hurt?
Most patients find it manageable with the appropriate use of numving. The procedure is typically quicker than the original lip volume treatment.
Will my lips look worse than before I started after dissolution?
There is typically a brief period in the first 24 to 48 hours after dissolution where the lips may appear slightly deflated or flat relative to the true natural baseline. This occurs because the reversal has a temporary effect on surrounding natural tissue.
Keep in mind that if you’ve had treatment for a long time, dissolving it will reveal your lips’ true natural baseline, which may have changed due to the normal aging process since you started treatments.
How much does dissolution cost?
Dissolution pricing in Australia typically ranges from $700 to $1000 for a single session. Clinics that treat their own patients’ complications typically absorb or discount this cost as part of their complication management process. When dissolving product from a different provider, the full fee usually applies.
Can PDO threads or Rejuran be dissolved?
Not in the same way as traditional cosmetic treatments. PDO threads dissolve naturally over 6 to 12 months and cannot be chemically dissolved. Individual threads that extrude to the surface can be physically removed at the clinic. Rejuran effects diminish naturally over time and cannot be reversed with a dissolution agent.
Want to know more about lip enhancement?
Read our complete guide to lip enhancement in Australia.
One of the most common questions before a first lip enhancement appointment is how much volume to use. This guide explains lip enhancement treatment volume, including what the volume numbers mean, what different volumes realistically achieve, and why volume is less relevant than many believe.
Quick answer: The specific volume of treatment is less relevant than the type of volume and the technique. Specific volume requirements vary depending on starting size, lip tissue type, product, technique, and goals. The right approach is to start conservative for your specific needs and add more once healed if needed. Post-treatment swelling let’s you experience a bigger change, so you will know if more volume at a subsequent session is needed.
What does the volume number actually mean?
Volume in lip enhancement refers to the amount of treatment administered in a single session, measured in millilitres. A standard syringe used for lip volume treatment contains 1ml of product. Half a syringe is 0.5ml. Many clinics offer the option between the two.
The volume number is a measure of quantity, not outcome. The same 1ml administered by two different clinicians using two different techniques can produce dramatically different results. Volume is one input into the outcome; technique, product selection, treatment depth, and anatomical starting point all contribute equally or more.
What different volumes realistically achieve
Associating a result with just volume is impossible without understanding your starting point, product type, lip tissue type, and treatment technique. However, as a rule of thumb, most people need more volume than they initially believe.
Despite this, a conservative approach (in both type and quantity) is always preferable, because once healed, more can always be added.
| Volume | Best suited to | Typical visible outcome | Who it suits |
|---|---|---|---|
| 0.25ml | Very small lips | Hydration change only | Patients wanting the smallest possible change; those with existing volume wanting minor correction |
| 0.5ml | Very small lips, routine maintenance | Noticeable but natural improvement; visible change in most anatomies | First-time patients; patients with moderate baseline volume; patients who want to test their response before committing to more |
| 1ml | Average lips, routing maintenance | Meaningful result in most anatomies; significant in lower-volume lips | Patients with naturally thin lips; patients building on prior 0.5ml treatment; patients with clear shape or asymmetry goals |
| 1.5ml | Fuller lips, building size | Substantial change; requires experienced clinician to maintain natural appearance | Patients with very low baseline volume; patients with significant asymmetry; those with restoration goals after volume loss |
| 2ml+ | More pronounced changes | Dramatic change; almost always staged across two sessions | Rarely appropriate in a single session; discuss with practitioner |
Interestingly, it is almost never the case that someone needs exactly 0.5 or 1mL exactly. It has historically been advertised this way to productise a service, so people undergo more treatments.
How to choose the right lip treatment size
To choose the right lip filler size, have a consultation with an experienced aesthetician. Trying to choose the right size without the knowledge and experience of an expert is difficult, and inaccurate. Rather than trying to choose the right size, think about the goals you have for your lips. During a consultation, clearly communicate these goals. It is the job of the clinician to design the best treatment plan to achieve the lip size you want.
Why the volume decision belongs at consultation, not booking
Any clinic that asks patients to select their volume at the time of online booking before they have been assessed by a practitioner is working backwards. Volume selection before assessment prioritises sales over outcome.
The appropriate volume for a given patient depends on:
- The natural volume and shape of both the upper and lower lip
- The ratio of upper to lower lip (the aesthetic ideal is approximately 1:1.6, with the lower lip fuller)
- The lip-to-face proportion: lips that look natural on one face may look excessive on another
- The patient’s specific goals: border definition and hydration requires less volume than overall fullness
- Prior treatment history: residual product from prior sessions changes the anatomical starting point
- The technique being used: some techniques achieve more result per ml than others
A conservative first treatment with a follow-up refinement session is preferable to a maximal first approach. Post-treatment swelling allows you to experience a bigger change, without the risk of over-treating.
It is straightforward to add volume at review once the initial swelling has resolved and the result is clear. Reversing an overfilled result often requires dissolving the entire treatment and starting again.
As it is impossible to predict volume requirements with certainty, it is not possible to know exactly how much volume you need.
The upper lip vs lower lip — does volume split matter?
Most lip enhancement treatments address both the upper and lower lip in the same session. The split of volume between upper and lower is a technique decision, not a patient preference. A common error is placing excessive volume in the upper lip relative to the lower as this creates an unnatural proportion and is a frequent contributor to overdone-looking results.
The lower lip is naturally fuller than the upper lip in most aesthetically balanced faces. Treatment planning that respects this ratio rather than maximising upper lip volume because it is the most visible produces consistently more natural outcomes.
Of course, treatments should also consider your personal aesthetic preferences. Part of treatment planning is not just about ideal ratios, but also understanding your lip goals, and tailoring the volume distribution to achieve the look you want.
What 0.5ml looks like vs 1ml — realistic expectations
The most common source of disappointment after first-time lip treatment is expecting a certain result and getting something different, usually more subtle than expected.
| Starting anatomy | 0.5ml result | 1ml result |
|---|---|---|
| Naturally thin lips with low baseline volume | Very subtle volume improvement; natural-looking; likely less than many patients expect | Noticeable change; still natural with correct technique |
| Moderate baseline volume | Subtle definition improvement only | Modest volume and definition increase; ideal result in most cases |
| Good baseline volume already present | Minimal visible change, if any | Minimal enhancement; subtle definition improvement |
| Post-prior treatment (some residual product) | Top-up and refinement | Potentially more than needed, assess with practitioner first |
The concept here is that larger baseline lips need more volume to see a change, compared to smaller natural lips that need less.
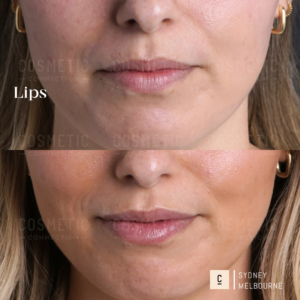
Before and after 1mL (healed)
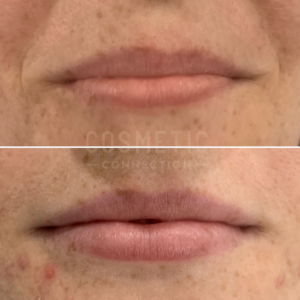
Before and after 0.5mL (healed)
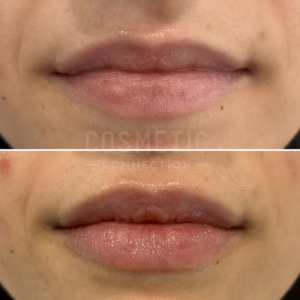
Before and after 1mL (healed)
For more visual references of realistic results across different starting points, see our guide to what natural-looking lip enhancement actually looks like.
If you want to explore your options and suitability for lip enhancement, request a consultation with our clinical team. We’ll assess your lips using our 3 pillar framework, and provide fair, honest guidance.
[ctaForm]
Does 1mL make a difference?
Yes, in most cases 1mL is sufficient to achieve a visible difference. The exception is in cases where there is a larger starting size, in which case 1mL is often insufficient.
Frequently asked questions
Is 0.5ml enough to make a visible difference?
For most patients with naturally thin or low-volume lips, yes, 0.5ml produces a visible (yet subtle) improvement. For patients with moderate existing volume who want a subtle refinement, 0.5ml is often insufficient. The result depends more on the product, technique used, and the starting anatomy than on the volume alone.
Will 1ml look unnatural?
Not necessarily. The result primarily depends on product type and technique rather than volume. Unnatural results are caused by a treatment that does not respect what the anatomy supports, and by incorrect placement, not just the volume. Inexperienced clinicians compensate for poor technique and product selection by using more volume than necessary.
Can I get more volume added at my review?
Yes. A follow-up appointment is standard practice at reputable clinics and allows both the practitioner and the patient to assess the final result once all swelling has resolved. If additional volume would improve the outcome, it can be discussed and administered at that point. This is far preferable to over-treating at the first session.
What happens if I get too much volume?
If the result is overfilled or unnatural, the cosmetic substance can be reversed. Reversal returns the lips toward their natural baseline within 24 to 48 hours, after which new treatment can be planned with a corrected approach. See our guide to reversing lip enhancement treatments for a full explanation.
Want to know more about lip enhancement?
Read our complete guide to lip enhancement in Australia.
The technique used during a lip enhancement appointment significantly influences the shape, distribution, and quality of the result. This guide explains the main techniques used in Australian clinics, what each achieves, which anatomy each suits, and how the technique decision should be made.
Quick answer: The main lip enhancement techniques are classic volumising, Russian technique, cupid’s bow enhancement, and holistic peri-oral approach. Each produces a different result and suits different goals and lip types. Technique selection is a clinical decision based on individual anatomy, not a patient menu choice.
Why technique matters as much as volume
The same amount of substance placed by two different clinicians using two different techniques can produce completely different results in shape, distribution, longevity, and aesthetic outcome. Volume determines quantity; technique determines where that quantity goes and what it achieves.
Understanding the main techniques helps patients ask better questions at consultation and understand why their practitioner recommends a particular approach for their anatomy.
The main lip enhancement techniques
| Technique | Description | Result | Best suited to |
|---|---|---|---|
| Classic volumising | Product distributed through the body of both lips to add overall fullness | Softer, rounder fullness; natural volume increase | Patients primarily seeking overall volume increase; first-time patients with thin lips |
| Russian technique | Vertical treatment approach that creates height and projection centrally; product placed centrally with less lateral spread | Pronounced cupid’s bow, heart-shaped appearance; projection and height rather than overall volume | Patients wanting a defined, projected lip with clear central peak and minimal side volume |
| Cupid’s bow enhancement | Targeted volume at the two peaks of the upper lip to define the natural M-shape | More pronounced upper lip architecture; improved definition of the central lip feature | Patients with flat or undefined cupid’s bow; patients wanting upper lip character without overall volume |
| Holistic peri-oral approach | Multiple techniques tailored specifically to the entire lip region and goals; most common in experienced hands | Comprehensive result addressing multiple goals in a single session | Most patients: the anatomy dictates the combination |
Before and after classic volumising lip treatment.
Before and after Russian lip technique.
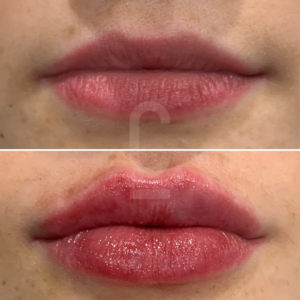
Before and after Cupid’s bow definition treatment.
Before and after holistic perioral approach.
The Russian technique: detailed explanation
The Russian technique has become widely searched because of its distinctive aesthetic, a pronounced cupid’s bow, significant upper lip height and projection, and a heart-shaped appearance when looking straight on. It is not better or worse than other techniques, it produces a specific result that suits specific anatomy and goals.
The technique uses a vertical approach, placing product more centrally in the lip with less volume spread to the lateral portions. This creates height (the lip appears taller from above the border) and projection (the lip comes forward) rather than lateral fullness.
Considerations for the Russian technique:
- It requires advanced skills and specific training — it is not simply a matter of using a different syringe position
- It is not anatomically suitable for all lip types — patients with very thin lips or minimal natural upper lip height may not achieve the intended result and may be better served by classic volumising first
- It tends to break down slightly faster than classic technique because the product is more concentrated centrally in a high-movement zone
- Your practitioner should assess your anatomy before recommending this technique — requesting it specifically without assessment is not appropriate clinical practice
Needle vs cannula: how instruments affect the result
Both needles and cannulas are used for lip treatments. The choice of instrument affects technique, comfort, bruising risk, and precision.
| Instrument | Advantages | Disadvantages | Common use |
|---|---|---|---|
| Sharp needle | Greater precision; more control over exact placement; suited to small, precise treatment points | Higher bruising risk; multiple insertion points needed for full lip coverage | Border definition; cupid’s bow; small-volume targeted placement |
| Blunt cannula | Lower bruising risk; covers larger areas with fewer insertion points; reduced vascular penetration risk | Less precise for very targeted placement; requires specific technique | Overall volumising; body of the lip; patients with higher bruising risk |
Many experienced clinicians use the right instrument for the job — needle for precise work, cannula for volumising the body of thin lip. The instrument selection is a technical decision made by the practitioner based on the technique being used and the individual patient’s anatomy.
PDO thread techniques for the lips
PDO thread treatment for the lips uses a different mechanism — threads create definition rather than volume. The technique involves placing fine threads along the lip border or through the lip tissue, creating a mechanical lifting and everting effect as the threads tighten and integrate with surrounding tissue.
PDO thread techniques for the lips include border threads (placed along the vermillion border to define and slightly evert the lip edge), commissure threads (placed at the corners to lift downturned corners), and lip body threads (placed through the lip tissue to provide subtle lift and collagen stimulation). The technique used depends on the specific concern being addressed.
If you would like an honest assessment of what is realistic for your specific anatomy, request a consultation with our clinical team. We’ll assess your lips using our 3 pillar framework, and provide fair, honest guidance.
[ctaForm]
Frequently asked questions
Can I request a specific technique at my appointment?
You can express a preference for a particular aesthetic result — such as more height and projection, or softer overall fullness — and your practitioner should explain which technique best achieves that for your anatomy. Requesting a specific technique by name without assessment is not appropriate; the same technique produces different results in different anatomies, and your practitioner needs to assess you before recommending an approach.
Is the Russian technique safe?
Yes, when performed by a trained and experienced clinician. The technique requires specific training beyond general training, and practitioners who perform it should have demonstrated experience with this approach specifically. Ask directly about their training and experience with the Russian technique before proceeding.
Which technique gives the most natural result?
There is no single technique that universally produces the most natural result — the most natural result comes from the technique that best suits the individual anatomy and goals. For most patients seeking a natural enhancement, a combined anatomical approach using the minimum effective volume produces the most consistently natural outcome. See our detailed guide on natural lip enhancement results for more.
Do lip treatments hurt?
Some mild discomfort during lip treatment is normal. Most clinics offer topical numbing cream to reduce discomfort. Doctor-led clinics may also offer numbing to further reduce any sensations during treatment.
Want to know more about lip enhancement?
Read our complete guide to lip enhancement in Australia.
Nose filler is the colloquial term for one type of non-surgical rhinoplasty, a cosmetic procedure that reshapes the nose without surgery. It is one of the most searched cosmetic treatments in Australia, and one of the most misunderstood. This reference guide covers the complete picture: what nose filler is, how it works, what it can and cannot achieve, how long results last, what the risks are, what the procedure costs in Australia, how to find a qualified provider, and how the treatment compares to surgical rhinoplasty. It is written as a comprehensive resource for anyone researching this topic in depth.
Quick answer: Nose filler, also called liquid rhinoplasty or non-surgical rhinoplasty, is a procedure that uses a substance to reshape the nose without surgery. Results are immediate, last 12–18 months, and are reversible. In Australia, the substances used must be administered under appropriate medical supervision.
What is nose filler and what substance is used?
Nose filler refers to the use of a cosmetic treatment, most commonly a hyaluronic acid-based substance, to add volume and alter the shape of the nose. Hyaluronic acid is a naturally occurring substance found in the body’s connective tissue. When used as a treatment, it is formulated into a gel of varying densities to suit different anatomical applications.
For the nose specifically, a firmer, higher-density formulation is used to provide structural support, the same gel used for lips would not provide sufficient lift or definition in the nasal region. The choice of product, its rheology (how it behaves under pressure and movement), and the injection technique all influence the quality and safety of the outcome.
The procedure is also sometimes called a liquid rhinoplasty, non-surgical nose job, or injectable rhinoplasty, all referring to the same treatment.
What can nose filler achieve?
Nose filler works through the strategic addition of volume, it does not remove tissue or physically restructure bone or cartilage. This is the most important distinction between nose filler and surgical rhinoplasty.
What nose filler can achieve:
| Concern | Mechanism | Realistic outcome |
|---|---|---|
| Dorsal hump (bump on the bridge) | Filler above and below the hump creates a straighter profile line | Significant visual correction of profile; hump is camouflaged, not removed |
| Flat or low nasal bridge | Volume added along the dorsum increases height and projection | Improved proportion; nose appears slimmer and more defined |
| Drooping nasal tip | Volume projects the tip upward | Visible lift and improved rotation |
| Nasal asymmetry | Volume added to the smaller or lower side | Meaningful correction of minor asymmetry |
| Wide nose (flat bridge type) | Bridge height addition creates vertical definition | Nose appears slimmer through proportional change |
| Nose-to-face proportion | Strategic volume placement improves overall facial balance | Improved harmony between nose and other features |
What nose filler cannot achieve:
- Physical reduction of nose size
- Narrowing of the nasal bones or nostrils
- Correction of a deviated septum
- Improvement of breathing function
- Permanent structural change
How does the procedure work?
A non-surgical rhinoplasty session involves the following steps:
- Consultation and assessment — the treating practitioner reviews the patient’s goals, examines the nasal anatomy including skin thickness, vascular landmarks, and existing tissue, and discusses realistic outcomes and risks, to determine suitability
- Treatment planning — injection points, product selection, and volume are mapped based on the individual anatomy
- Injection — the procedure takes 10–20 minutes; a fine needle or cannula is used depending on the zone and technique
- Real-time assessment — results are assessed from multiple angles during the procedure and adjustments made
- Aftercare and follow-up — aftercare instructions are provided and a follow up may be scheduled
How long does nose filler last?
The longevity of nose filler depends on several interacting factors:
| Factor | Direction of effect |
|---|---|
| Product density (cross-link level) | Higher density = longer duration |
| Volume injected | Higher volume = generally longer duration |
| Nasal zone (bridge vs tip) | Bridge lasts longer; tip sees slightly faster reduction |
| Individual metabolism | Higher metabolism = faster breakdown |
| Treatment history | Residual from prior sessions can extend longevity |
In clinical practice, nose filler results typically persist for 12–18 months. The nasal region is a relatively low-movement area compared to lips or forehead, which contributes to longevity at the longer end of this range for many patients.
After 2–3 consistent treatment cycles, some patients find that residual product from previous sessions means each subsequent treatment requires less volume to achieve the same result.
What are the risks of nose filler?
The nose is considered one of the higher-risk areas of the face for injectable treatments, although it is still classified as a low-risk treatment when performed correctly. Understanding the risk profile is essential for both patients and practitioners.
Vascular occlusion — the most serious risk
Vascular occlusion occurs when the injectable substance enters or compresses a blood vessel, interrupting blood supply to the surrounding tissue. Vascular occlusion is one of the most serious complication associated with facial injectable treatments.
The nasal anatomy includes the angular artery, dorsal nasal artery, and lateral nasal artery — branches of larger vessels with anastomotic connections that can, in rare cases, allow the injectable substance to reach the ophthalmic artery and vessels supplying the eye.
Signs of vascular occlusion:
- Blanching (immediate white discolouration) of the skin during or after injection
- Unusual or disproportionate pain during injection
- Progressive skin discolouration post-procedure
- Vision changes (rare — indicates severe complication)
Management: immediate administration of an appropriate reversal agent is the primary intervention. This must occur within minutes to avoid permanent tissue damage. This is why the reversal agent must be physically present in the clinic at every appointment — not available to order or accessible nearby.
Other risks:
| Risk | Incidence | Management |
|---|---|---|
| Bruising | 5–10% of patients | Resolves 3–7 days; hirudoid may help |
| Swelling | Very common | Resolves 24–72 hours |
| Surface irregularities or lumps | Uncommon with correct technique | Review after healed; reversal if persistent |
| Asymmetry | Common temporarily; persistent uncommon | Review after healed; additional treatment or reversal |
| Infection | Rare | Antibiotic treatment; medical review |
| Treatment migration | Rare with correct technique | Assessment and reversal if necessary |
| Skin necrosis | Remote; associated with vascular occlusion | Emergency reversal; wound management |
Is nose filler reversible?
Yes. The treatments used for non-surgical rhinoplasty in Australia can be reversed using an enzyme that catalyses the breakdown of hyaluronic acid. When administered into the treated area, hyaluronidase produces significant reversal within 24–48 hours in most cases.
Reversal is used in three contexts:
- Emergency reversal — in the event of vascular occlusion, immediate hyaluronidase administration is the primary treatment
- Aesthetic reversal — if a patient is unhappy with the result, elective reversal returns the nose to baseline before re-treatment
- Pre-treatment clearance — if a patient presents with existing filler from a prior provider, reversal is sometimes indicated before adding new product
This reversibility distinguishes hyaluronic acid filler from permanent injectable substances (PMMA, silicone, calcium hydroxylapatite used non-standard) — none of which should be used in the nose because complications from these products cannot be reversed.
How much does nose filler cost in Australia?
Non-surgical rhinoplasty in Australia is priced across a wide range depending on the provider model, the practitioner’s qualifications, the location, and the volume and product used.
| Pricing tier | Typical Australian range | What it typically reflects |
|---|---|---|
| Budget | $600–$900 | Nurse-led, high volume, variable safety protocols |
| Mid-range | $90–$1,100 | Mixed models |
| Doctor-led premium | $1,100–$1,800 | Medical assessment, full complication preparedness |
By city:
- Sydney: $900–$1,800
- Melbourne: $850–$1,600
- Brisbane: $800–$1,200
- Gold Coast: $750–$1,500
Non-surgical rhinoplasty is not covered by Medicare or private health insurance in Australia. It is a cosmetic procedure with no applicable item numbers.
Nose filler vs surgical rhinoplasty: a complete comparison
| Factor | Nose filler (non-surgical) | Surgical rhinoplasty |
|---|---|---|
| Anaesthesia | Topical numbing only | General anaesthesia |
| Procedure time | 10–30 minutes | 2–4 hours |
| Downtime | None to minimal | 2–4 weeks |
| Results visible | Immediately | After 6–12 months (swelling resolves gradually) |
| Duration of results | 12–18 months | 10+ years – nose changes with age |
| Reversible | Yes | No |
| Can reduce nose size | No | Yes |
| Can narrow nostrils | No | Yes |
| Can correct breathing | No | Yes (septoplasty component) |
| Can remove dorsal hump | Camouflages | Physical removal |
| Risk | Low | High |
| Cost in Australia | $900–$1,800 | $15,000–$25,000+ |
| Repeat treatments required | Yes — every 12–18 months | Potentially – every 10-15 years |
| Suitable for structural change | No | Yes |
| Suitable for subtle proportion improvement | Yes | Yes |
Read more about surgical vs non-surgical nose reshaping.
Who performs nose filler in Australia?
In Australia, cosmetic injectable treatments, including the substances used for nose filler must be prescribed by an authorised prescriber (a registered medical doctor) and administered under appropriate clinical supervision.
In practice, non-surgical rhinoplasty is performed by:
- Cosmetic doctors: registered medical practitioners with specific training in cosmetic injectable medicine. This is generally the recommended model for nasal injectable treatment given the complexity and risk profile
- Plastic surgeons: primarily surgical specialists; may offer non-surgical rhinoplasty as a complementary service, with less experience in injections
- Nurses: registered nurses or nurse practitioners who, in a properly supervised model, may administer injectable treatments under doctor oversight. The degree of oversight varies significantly in practice
- Dermatologists: skin specialists who may offer cosmetic injectables as a complementary service
Nose filler in Sydney and Melbourne
Non-surgical rhinoplasty is among the most commonly performed cosmetic injectable procedures in both Sydney and Melbourne. Both cities have a high concentration of providers across a wide quality spectrum.
In Sydney, nose filler providers are concentrated in the CBD, North Shore, Eastern Suburbs, and Inner West. Pricing reflects Sydney’s higher operating costs and averages $1,100–$1,800 for doctor-led treatment.
In Melbourne, nose filler providers are concentrated in the inner south-east, including Toorak, South Yarra, Hawthorn, and Prahran, as well as the CBD. Pricing averages $850–$1,600 for doctor-led treatment.
Cosmetic Connection offers doctor-led non-surgical rhinoplasty at its St Leonards (Sydney) and Toorak (Melbourne) clinics, using a suitability-first assessment model and flat-fee pricing.
[ctaForm]
Specific nose types and treatment considerations
Flat bridge (common in East Asian, Southeast Asian, South Asian, and African anatomies) Bridge height treatment is one of the most consistently satisfying applications of non-surgical rhinoplasty. Adding volume along the dorsum increases vertical projection, which reads as a slimmer, more defined nose from the front. Results are predictable and longevity is typically at the longer end of the range due to the low-movement nature of the bridge.
Dorsal hump (bump on the bridge) The camouflage technique, adding volume above and below the hump to create a straight profile line — is effective for small to moderate humps. Large humps exceed the practical limit of the non-surgical approach; the volume required to create a straight profile makes the overall nose appear larger and wider. For large humps, surgical rhinoplasty is the appropriate intervention.
Drooping tip Tip placement rotates it upward, shortening the apparent length of the nose and improving the profile. This is a technically demanding zone as the skin over the tip is thinner and more transparent than over the bridge, making surface irregularities more visible. Conservative, precise volume is essential.
Bulbous tip Filler adds volume, and when used strategically can refine a bulbous tip. However, over-treatment worsens the concern. Therefore, for pronounced changes, surgery is more appropriate.
Wide nose Width caused by a flat bridge responds well to bridge height treatment. Width caused by wide nasal bones or a large nostrils cannot be improved non-surgically. An honest suitability assessment must distinguish between these two presentations before treatment is offered.
What do nose filler results look like?
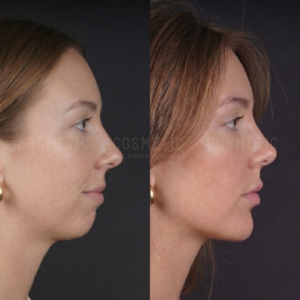
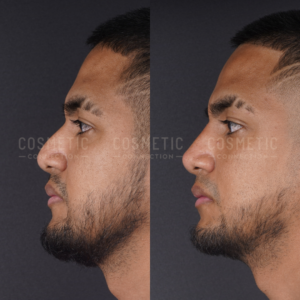
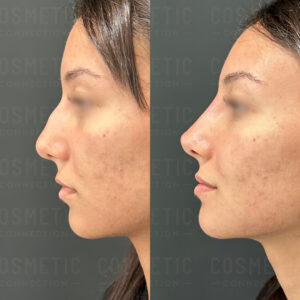
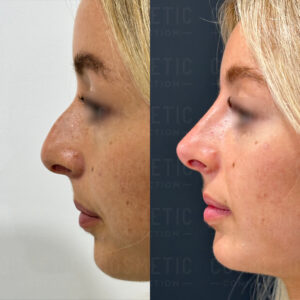
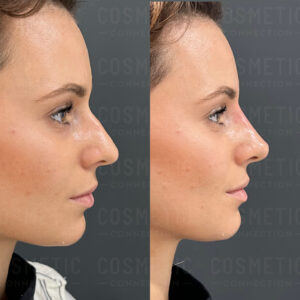
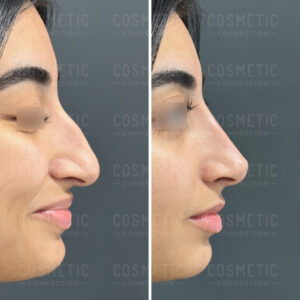
Aftercare for nose filler
Post-treatment care affects both the safety and longevity of the result.
Immediate (0–48 hours):
- Avoid strenuous exercise, alcohol, and direct heat exposure
- Do not apply pressure to the nose: no glasses resting on the bridge, no face-down massage
- Apply a wrapped ice pack briefly if swelling is uncomfortable
- Avoid makeup directly over injection sites for 24 hours
First 2 weeks:
- Avoid high-impact exercise for the first 48–72 hours; resume gradually
- No facials or treatments applying pressure to the nose
- Avoid prolonged sun exposure without SPF
- Glasses that rest on the bridge should be avoided for at least 1 week; ideally 2 weeks
Assessment: The final result is visible at 2 weeks once all swelling has resolved. A follow-up review appointment at this stage is standard practice at reputable clinics and allows for assessment and minor adjustments if needed.
Nose filler swelling stages – what to expect
Following non-surgical rhinoplasty (nose filler), it’s normal to experience swelling. Here’s a breakdown of the stages of nose filler swelling you can expect:
Immediately after treatment
- Slight redness and tenderness around the injection sites.
- Minimal swelling, localised to the treated areas. This is usually barely noticeable, but may appear slightly uneven.
Day 1:
- Swelling reaches its peak within 24 hours. Your nose may look fuller and puffy.
- This is temporary and doesn’t reflect the final result.
- You may notice mild discomfort in your nose.
Days 2-3:
- Swelling subsides, becoming less noticeable each day.
- Your nose will still look somewhat puffy, but the shape will become more defined.
Days 4-5:
- Swelling should be mostly resolved.
- Any slight persistent swelling will reduce over the next week, revealing your final result.
Tips to reduce swelling after non-surgical rhinoplasty
- Everyone heals differently, so your own experience may vary.
- If you experience significant swelling, pain, redness, or bruising, immediately contact your clinic.
- Avoid activities that worsen swelling for 24 hours. This includes alcohol, strenuous activities, excessive heat, and sun exposure.
- Minimise swelling by gently applying wrapped cold pack to your nose. Use it intermittently for a few hours after your treatment.
How to choose a nose filler provider in Australia
The most important criteria when evaluating a nose filler provider:
- Doctor-led or genuinely doctor-supervised — choosing a clinic that has doctors on site, not just “medically affiliated”
- Doctors with proper training — General injectable training is not enough. Nose-specific training is required
- Reversal agent on-site at every appointment — confirmed, not just “available”
- Specific nasal injectable experience — ask directly about volume and training
- Genuine suitability assessment — not a booking form
- Transparent, upfront pricing — flat-fee preferred; per-unit pricing creates incentives for over-treatment
- Follow-up review included — standard at responsible clinics
- Clear complication management process — ask specifically what happens if there is a vascular event
Red flags: no doctor involvement, reversal agent not confirmed, treatment booked without proper consultation, pricing that changes on the day, discount vouchers for nose treatment specifically.
Practitioner verification: AHPRA registration can be confirmed at ahpra.gov.au for all registered medical practitioners and nurses.
Common myths about nose fillers
Myth: Nose fillers are painful.
Fact: Nose fillers can cause some discomfort, but the procedure is generally very well-tolerated.
Myth: Nose fillers are permanent.
Fact: Nose fillers are not permanent. The effects of nose fillers typically require maintenance every 12-18 months.
Myth: Nose fillers cannot drastically change the shape of your nose.
Fact: While nose fillers are powerful ways to optimise fine details of your nose, when used correctly that they can also dramatically alter the shape of your nose for the better.
Myth: Anyone with basic training can perform a nose filler treatment.
Fact: It is important to have nose fillers administered by a qualified medical professional with extensive experience in treating noses.
Myth: Nose fillers can cause serious side effects.
Fact: Like any medical procedure, there are potential risks and side effects associated with nose fillers include serious ones. This is why its vital to choose the right clinician, to keep the risks low.
Myth: You can’t wear glasses after getting nose fillers.
Fact: While you may experience some swelling or tenderness after getting nose fillers, you should be able to wear glasses a few days after the procedure.
Myth: Nose fillers are only for women.
Fact: Both men and women can benefit from nose fillers. In fact, the demand for non-surgical nose enhancement among men has been significantly increasing in recent years.
Myth: Nose fillers can make you look fake or artificial.
Fact: When performed by a qualified medical professional, nose fillers refine your nose and give you a more balanced, proportionate look.
Myth: Nose fillers are only for people with small noses.
Fact: Nose fillers can be used to enhance the appearance of any size nose.
Myth: Nose fillers will widen the nose from the front.
Fact: Experienced clinicians are able to make your nose look slimmer from the front.
Myth: Nose fillers have a high risk of making you go blind.
Fact: Vision loss is a risk of all fillers, but it is a very remote risk when adequate precautions are taken, and the treatment is performed by a fully trained doctor.
Frequently asked questions
What is the difference between nose filler and non-surgical rhinoplasty?
They are the same procedure described with different terminology. Nose filler refers to the injectable treatment used; non-surgical rhinoplasty refers to the procedural outcome — nose reshaping without surgery. Liquid rhinoplasty is another term for the same thing.
Can nose filler fix a broken nose?
No. A broken nose involves structural damage to the nasal bones. Injectable treatment adds volume — it cannot repair or realign bone. Some post-injury cosmetic asymmetries can be partially improved non-surgically, but this requires careful assessment and is not appropriate in all cases.
Can dermal filler lift the nose tip?
Yes, the nose tip can be lifted by adding projection and support.
Is nose filler safe during pregnancy or breastfeeding?
No. There is no safety data for cosmetic injectable treatments during pregnancy or breastfeeding. They are contraindicated in both situations.
How do I know if my previous nose filler has fully gone?
The most reliable way is assessment by a qualified practitioner. Ultrasound imaging can identify residual product in some cases. Clinically, a practitioner can assess tissue consistency and behaviour at the injection sites to estimate how much residual product remains.
What is the tinkerbell nose tip with dermal filler?
The tinkerbell nose tip describes an approach that aims to maximise tip projection. This is achieved by projecting the nose tip, and leaving a cap in the supratip area, creating a deep inflection point between the dorsum and tip.
Can nose filler migrate to other parts of the face?
With correct technique, migration is uncommon. However, inappropriate injection depth, excess volume, or product with poor structural properties can lead to the substance shifting from the intended location over time. This is one reason product selection and technique matter significantly for this procedure.
What is the difference between a cannula and a needle for nose filler?
Both are used for non-surgical rhinoplasty. A needle is sharp and allows more precise point placement. A cannula is blunt and flexible, which reduces the risk of penetrating a blood vessel directly. Many practitioners use a combination of both techniques depending on the zone. Neither approach entirely eliminates vascular risk — knowledge of anatomy and aspiration technique are more important than the instrument used.
How many sessions of nose filler does it take to achieve the result I want?
In most cases, one session achieves the primary result. A second session may refine the outcome once swelling has fully resolved at 2 weeks and the practitioner has a clear view of the baseline result. Ongoing maintenance sessions every 12–18 months maintain the achieved result over time.
How do you sleep with nose fillers?
Avoid sleeping on your stomach or with your face pressed against your hands, wrists and arms for 5 days. Sleeping with one pillow on your back or side is ideal.
Are nose fillers worth it?
Nose filler has a very high satisfaction rate, but whether or not it is worth it is a very personal decision that depends on how dissatisfied you are with your current nose, and how you perceive the cost and risk involved in treatment. A consultation is the best way to find out whether nose fillers are worth it for you.
Does nose filler work for asian noses?
Yes, nose filler is one of the most commonly performed cosmetic treatments in Asia. Typically, treatments aim to project and define the nasal bridge.
What happens to my nose if I stop having nose filler after many years of treatment?
The injectable treatment gradually reduces after cessation of maintenance sessions, and the nose returns toward its natural baseline. There is no evidence that long-term nose filler use permanently alters the nasal anatomy in ways that would make the natural nose look worse — though this is a common concern. Some patients find their nose looks very similar to their pre-treatment baseline after full reduction of accumulated product.
Want to know more about non surgical rhinoplasty?
Read our complete guide to non surgical rhinoplasty in Australia.
Fat dissolving is non-surgical — and while they are no downtime, there’a some important things to understand about the post-treatment period.
Many patients expect to walk out with a slimmer chin and carry on as normal. Instead, they walk out looking more swollen than when they walked in. This surprises people who weren’t properly prepared — and it’s the reason recovery deserves its own guide.
We call this the”swelling stage”. It isn’t a complication. It isn’t a bad reaction. And it doesn’t mean something has gone wrong. In fact, swelling is a sign the treatment is doing exactly what it’s supposed to do.
Fat dissolving works by triggering a controlled inflammatory response. The process damages the fat cell wall, and your body floods the area with fluid and immune cells to break down and clear the destroyed fat. No inflammation means no fat destruction — so swelling isn’t optional, it’s essential.
This guide walks you through the full recovery process step by step:
- what swelling should look and feel like
- how long each phase lasts
- what’s normal, what’s not, and when to call your clinic
- and how to care for the area so healing stays smooth and predictable
If you know what’s coming, recovery feels manageable — not alarming. And once the swelling settles, the payoff becomes clear.
What is the “swelling stage”? (And why you want it)
The “swelling stage” effect describes the visible swelling that appears almost immediately after fat dissolving in the double chin area. For most patients, the under-chin can look up to twice its usual size within hours of treatment. It can feel firm, puffy, warm, or slightly tender to touch.
This swelling happens for two reasons.
- The treatment itself adds temporary volume.
- Your body sends fluid and inflammatory cells to the area to break down the damaged fat cells and carry the debris away. This biological clean-up process is what ultimately creates the result.
This is why fat dissolving swelling is not something to “avoid” or suppress. It’s a core part of how the treatment works. Patients who swell tend to respond better than those who barely react.
Practically, this means a few things:
- You won’t walk out looking slimmer — you’ll look temporarily fuller.
- The swelling peaks early, then gradually settles.
- The presence of swelling does not predict poor results. It predicts activity.
Many patients plan their treatment around this phase. Booking before a weekend, wearing a scarf or high-neck clothing, or scheduling during a quieter social period can make the experience far more comfortable.
Once the swelling subsides, the contour change underneath becomes visible — and that’s when the result starts to feel worth it.
Fat dissolving recovery: Day-by-day timeline
Below is a realistic, experience-based guide to what most patients go through after fat dissolving under the chin. Everyone heals slightly differently, but this gives you a reliable framework so there are no surprises.
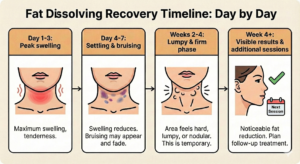
Days 1–3: Peak swelling (The “swollen” phase)
This is when swelling is at its maximum.
- The area under the chin may look significantly larger than before treatment.
- The tissue often feels soft, jiggly, or water-filled, similar to gel or jelly.
- Tenderness, warmth, and mild aching are normal.
- Some patients notice temporary numbness or tingling.
This phase is not a complication — it’s the inflammatory response breaking down fat cells. Trying to aggressively “flatten” the swelling at this stage is counterproductive.
Days 4–7: Settling and bruising
The swelling begins to reduce, but visual changes can be uneven.
- Bruising may become more visible as swelling drops (yellow, purple, or green tones).
- The area may feel firmer in patches rather than soft.
- Mild tightness or itchiness is common as healing begins.
Most people feel comfortable being seen in public again during this window, even though the area doesn’t look “normal” yet.
Weeks 2–4: The lumpy or firm phase
This stage causes the most worry — and it’s also the most misunderstood.
- You may feel small, firm, pea-sized or rope-like areas under the skin.
- The area can feel uneven or slightly tender to pressure.
This is called induration. It’s the fat hardening as it’s being broken down and cleared by your lymphatic system. These are not filler lumps, not scar tissue, and not permanent. They resolve gradually without intervention.
Beyond 4 weeks: Visible results appear
This is when the payoff happens.
- Swelling has resolved.
- The skin begins to retract and adhere more closely to the jawline.
- The under-chin profile looks smoother and more defined as results emerge.
- At this point, we assess whether:
- Another round of fat dissolving is needed (most people undergo 2-4 sessions), or
- Other treatments would add refinement, or
- Treatment is complete.
Fat dissolving is a gradual-reward treatment. The result doesn’t appear overnight — it appears once your body finishes the clean-up process.
Fat dissolving aftercare: The do’s and don’ts
Proper aftercare doesn’t make the treatment “work better” — but it does reduce unnecessary swelling, bruising, and discomfort while your body does the real work. Think of this phase as supporting the healing process, not interfering with it.
What to do after fat dissolving
Sleep on your back with 1-2 pillows for 3 nights. This helps fluid drain away from the treated area and can noticeably reduce morning swelling.
Apply cold packs for 20 minutes per hour, for up to 72 hours. This helps with swelling, comfort and bruising — not fat breakdown.
What To Avoid after fat dissolving
Alcohol for 48 hours. Alcohol increases inflammation and bruising, which can prolong recovery.
Heat exposure. Skip saunas, steam rooms, hot yoga, and long hot showers for at least 72 hours. Heat amplifies swelling during the inflammatory phase.
Massage or pressure (first 48 hours). Let the product stay exactly where it was placed. Early massage can shift inflammation into areas we deliberately avoided.
High-impact exercise (first 48 hours). Light walking is fine. Intense cardio or weight training can worsen swelling early on.
A Common Mistake
Trying to “fix” swelling with massage, devices, or aggressive lymphatic treatments too early can actually delay recovery. The goal is calm, steady healing — not forcing the area to flatten quickly.
How to reduce swelling after fat dissolving
Here are some great ways you can minimise any swelling after fat dissolving:
- Avoid hot environments until the swelling has resolved. This includes hot showers, saunas and sitting out in the sun.
- Sleep flat on your back (so the swelling drains back from the under chin to the lymphatic system in the neck)
- You can take an antihistamine on the day of your treatment, as long as you are medically suitable.
- Avoid touching or rubbing at the skin of your jawline.
- Gently apply a wrapped ice pack for 20 minutes per hour, for up to 72 hours.
How to reduce bruising after fat dissolving
If you are worried about bruising after fat dissolving, consider following these steps:
- Avoid excessive alcohol for 24 hours
- Avoid intense exercise for the first day
- Gently apply a wrapped cold pack intermittently for the first few hours after your fat dissolving (be careful not to apply any pressure).
- If you have bruising after your fat dissolving, you can cover it with makeup the day after your treatment.
Is fat dissolving safe? Addressing nerve injury & rare side effects
This is the part most clinics gloss over — and the part patients actually care about. Fat dissolving is widely used and well-studied, but it is still a biological treatment, not a cosmetic cream.
Understanding the real risks (and how rare they are) is part of informed consent.
The big picture
When performed correctly, fat dissolving is considered safe and predictable. Serious complications are uncommon, and most side effects are temporary and self-limiting. The key variable is clinician anatomy knowledge and depth control.
Temporary nerve weakness (The “uneven smile” concern)
This is the most searched fear — and for good reason.
What patients notice
- A slight asymmetry when smiling or moving the lower lip on one side.
Why it can happen
- The marginal mandibular nerve runs close to the jawline. If inflammation occurs near this nerve, it can temporarily reduce muscle movement.
What matters clinically
- This is not permanent nerve damage. It is usually a temporary conduction block caused by inflammation, not nerve destruction.
Recovery
- In the vast majority of cases, normal movement returns over weeks to a few months as swelling settles.
Risk reduction
- Correct treatment depth, conservative treatment near the jawline, and anatomical mapping dramatically reduce this risk.
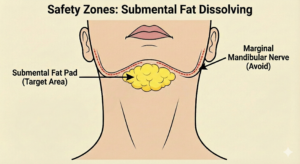
Neck tightness
What’s happening
- Early swelling can press on nearby tissues, creating a sensation of tightness.
What it isn’t
- It is unlikely to be airway compromise.
Timeline
- This resolves as swelling decreases, usually within days.
Skin changes & rare complications
Firm nodules or hardness
- These are expected during healing. They represent fat breakdown and inflammation, not scar tissue.
Skin injury or necrosis
- Extremely rare when treated at the correct depth by a trained medical professional. This risk rises sharply with poor technique or non-medical clinicians.
The honest risk summary
- Swelling: Expected
- Bruising: Common
- Temporary numbness or firmness: Normal
- Temporary nerve weakness: Rare
- Skin injury: Extremelyy rare
Fat dissolving has a strong safety profile — when anatomy is respected.
After fat dissolving: What’s normal — And when to call your clinic
Once the treatment is done, most of what happens next is predictable, even if it looks dramatic. Knowing what’s normal versus what needs review removes a lot of unnecessary anxiety during recovery.
What’s normal (Even if it feels strange)
In the days and weeks after fat dissolving, it’s common to experience:
- Significant swelling under the chin or jawline. This can peak in the first 48–72 hours and make the area look larger than before treatment.
- Tenderness or aching. Especially when touching the area or moving the neck.
- Firmness or small lumps. These develop as fat cells break down and the body clears the debris. They soften gradually.
- Numbness or altered sensation. Temporary nerve irritation is common and usually resolves on its own.
- Bruising. Often appears days later and fades from purple to yellow over 1–2 weeks.
All of the above are signs that the inflammatory process is doing its job.
What’s not normal (And should be checked)
Contact your clinic or seek medical attention if you notice:
- Severe or worsening pain that doesn’t respond to simple pain relief
- Rapidly increasing redness or heat spreading beyond the treated area
- Skin breakdown, blistering, or dark discolouration
- Persistent difficulty swallowing or speaking
- Asymmetry that worsens rather than improves after the first week
These scenarios are uncommon — but early review matters.
Timing matters: When symptoms should improve
A useful rule of thumb:
- Days 1–3: Expect swelling and discomfort
- Days 4–10: Swelling slowly reduces, bruising may peak
- Weeks 2–4: Firmness and nodules soften
- Beyond week 4: Final contour becomes visible
If symptoms fall outside this pattern, it’s reasonable to check in.
Why follow-up is part of safe treatment
Fat dissolving isn’t a “set and forget” procedure. A proper treatment plan includes:
- Clear aftercare instructions
- Access to clinical review if needed
- A follow-up assessment to decide if further treatment is required
This is also when skin retraction is evaluated — and when decisions about tightening treatments (if any) are made.
Bottom line
Most post-treatment concerns are normal, temporary, and self-resolving. Serious complications are rare, but good clinics want to hear from you if something doesn’t feel right.
Recovery is a process — not a moment.
Swelling is temporary. Structure is not.
Fat dissolving recovery can look dramatic in the short term, but it follows a reliable biological process. The swelling and firmness phases are not complications — they are the visible signs that fat cells are being broken down and cleared.
What matters most is understanding what phase you’re in, giving your body time to heal, and judging results only once the inflammation has fully settled.
For most patients:
- Healing is measured in days, not weeks
- The improved contour is long-lasting
When performed correctly and followed by appropriate aftercare, fat dissolving is one of the most predictable non-surgical ways to reduce under-chin fullness.
One last reminder
Fat dissolving treats volume, not skin or bone. If swelling has settled but the shape still isn’t right, that’s not a failure — it’s a diagnostic clue.
Sometimes the next step is:
- Another session
- Address loose skin
- Add chin and jaw structure
That’s why professional assessment matters more than chasing a single treatment.
Want to know more about double chin fat removal?
Learn more about double chin treatments in our complete double chin treatment guide.
Searching online for “double chin fat removal near me”?
Curious about whether you’re suitable for double chin fat dissolving? Explore our double chin treatment and start your journey.
You’re eating well, you exercise regularly, and your weight is healthy.
And yet — that soft pocket under your chin refuses to move.
This is one of the most frustrating aesthetic concerns we see. People assume a double chin must be caused by poor diet or lack of effort. In reality, many patients who ask why they have a double chin, and how to get rid of a double chin naturally are already doing everything “right”.
So the real question becomes:
Is it actually possible to lose a double chin naturally — or is most of the advice online just hype?
Here’s the honest answer.
Natural methods can help with muscle tone, posture, and fluid retention. They cannot reduce a genetic fat pad. Fat cells don’t respond to intention, exercises, rollers, or willpower. They respond to biology.
That’s why browsing double chin exercises, face yoga for double chin, gua sha tools, or even extreme diets often leads to temporary changes at best — and disappointment at worst.
In this article, we’ll break down:
- What natural methods can realistically improve
- What they physically cannot do
And why science, not discipline, is the only way to permanently remove submental fat.
No hype. No shaming. Just anatomy and truth.
The role of diet: Can you “starve” a double chin?
Diet is often the first place people look when trying to reduce a double chin — and in some cases, it can help. A sustained calorie deficit reduces overall body fat, and for some people who carry extra weight, the area under the chin responds along with the rest of the body.
But this isn’t the full story.
Why dieting has clear limits
The body doesn’t lose fat evenly. It follows a genetically programmed order that determines where fat is lost first and last.
This is why two people at the same weight can look completely different — and why many people notice that even as their face, waist, or arms lean out, the area under the chin remains unchanged.
This phenomenon is known as the absence of spot reduction. No dietary strategy — low-carb, fasting, clean eating, or otherwise — can selectively target one area of fat.
When genetics take over
For many patients, submental fat isn’t driven by lifestyle at all. It’s:
- Genetically determined
- Influenced by hormones
- Reinforced by jaw shape and neck structure
In these cases, the fat pad under the chin is biologically resistant. It often remains even at lower body weights, and attempting to lose it through diet alone can lead to unwanted changes elsewhere — such as facial hollowing or fatigue — before the chin meaningfully improves.
A more helpful way to think about it
Diet can reduce a double chin if weight gain caused it.
But if you’ve noticed that it:
- Persists across different weights
- Has been present since early adulthood
- Doesn’t change much despite consistent exercise
Then it’s likely anatomical rather than behavioural.
And anatomy doesn’t respond to restriction — it responds to targeted treatment.
Double chin exercises & face yoga: Toning vs. burning
Face yoga and targeted exercises for the double chin have become increasingly popular, particularly on social media. Movements like the “ceiling kiss,” exaggerated jaw extensions, or resistance-based neck exercises are often promoted as ways to “burn” fat under the chin.
They don’t — but they do affect something else.
What these exercises actually work on
Most double chin exercises activate the platysma, a thin sheet-like muscle that runs from the jawline down the neck. This muscle plays a role in neck tension, posture, and lower face support. Other muscles often activated include the mentalis (chin muscle), depressor anguli oris (mouth corner muscles), and the muscles that control tongue protrusion.
When you train these consistently:
- Muscle tone can improve slightly
- The neck may appear firmer at rest
- Some people notice better definition during movement
This is a real effect — just not the one most people are hoping for.
Why muscle tone ≠ Fat loss
Fat sits on top of muscle, not inside it. Strengthening the platysma doesn’t break down the fat cells that create fullness under the chin.
A useful comparison:
You can strengthen your abdominal muscles with sit-ups, but that alone doesn’t remove the fat covering them. The same principle applies to the neck and jawline.
Face yoga improves structure, not volume.
When exercises can help — and when they can’t
Exercises may be useful if:
- Your concern is mild skin laxity
- Your chin looks worse when your neck is relaxed or slouched
- You want to improve posture and muscle engagement
They’re unlikely to help if:
- The fullness is soft and pinchable
- The area hasn’t changed despite weight loss
- The fat has been present for years
In these cases, the limiting factor isn’t muscle tone — it’s the fat pad itself.
A more accurate expectation
Face yoga can support overall neck health and appearance. It can make the area look a little tighter, especially in motion or when posture improves.
What it can’t do is remove a genetically programmed fat deposit.
That distinction matters — because it explains why so many people do the exercises diligently and still see no meaningful change in the mirror.
What is “Mewing” — and does it work for a double chin?
Mewing is a technique that gained popularity online as a way to define the jawline without treatment. It involves pressing the tongue flat against the roof of the mouth, keeping the lips closed, and maintaining light jaw tension throughout the day.
The promise? A sharper jawline and less fullness under the chin.
The reality is more nuanced.
What mewing actually does
Mewing is a postural habit, not a fat-loss method. When done correctly, it:
- Elevates the tongue and floor of the mouth
- Engages muscles around the jaw and neck
- Temporarily tightens and lifts the appearance of the submental area
While you’re actively holding the posture, the area under the chin can look flatter and more defined. This is a mechanical effect, not a biological one. As soon as you stop mewing, the area returns to its natural appearance.
The age factor
“Mewing” was introduced as a concept in the 1970’s by Dr. John Mew to help improve jaw development and sleep in children and adolescents, whose facial bones are still developing. However, research has failed to find sufficient evidence that it works.
This aside, in adults, however, bone structure is already set.
That means:
- Mewing cannot reshape the jawline
- It cannot shrink fat cells
- It cannot reverse a genetic fat pad
- Any visible improvement disappears as soon as the posture relaxes.
Why it feels like it’s “working”
Many people report that mewing helps — initially.
That’s usually because:
- The neck is straighter
- The chin is lifted
- The muscles are engaged
Posture alone can significantly change how the jawline looks in photos or mirrors. But this doesn’t translate into lasting structural change.
The verdict
Mewing can be a helpful awareness tool for posture and jaw tension. It may improve how your profile looks when you’re consciously holding the position – great for quick, temporary fixes when taking photos.
What it cannot do is eliminate an existing pocket of fat under the chin.
If your double chin disappears only while you’re actively “mewing,” that tells you the issue isn’t posture — it’s likely volume.
Gua sha & rollers: Fat vs. fluid
Gua sha tools and facial rollers have become especially popular for people trying to reduce a double chin without medical treatment. They feel active, hands-on, and reassuringly “natural.” And to be fair, they do do something — just not what most people think.
These tools work on the lymphatic system, not the fat itself. When you glide a stone or roller along the neck, you encourage lymphatic drainage. That movement helps shift excess fluid that can collect under the chin due to salt intake, inflammation, poor sleep, or hormonal changes. When fluid moves, swelling drops — and the area can look slimmer almost immediately.
That’s why gua sha can feel effective at first.
But here’s the anatomical distinction most blogs gloss over:
Fluid and fat are completely different tissues. Lymphatic massage can move fluid. It cannot damage, shrink, or remove a fat cell.
In practical terms, this means:
If your “double chin” is actually puffiness or mild water retention, gua sha can temporarily improve how your neck looks.
If the fullness feels soft, pinchable, and consistent day to day, you’re dealing with submental fat — and rollers won’t change its volume.
Once lymphatic fluid naturally re-accumulates (which it does), the visual effect fades. That’s why results from gua sha require constant repetition and why stopping often leads to the chin looking exactly the same again.
Used correctly, these tools can support skin health, reduce morning puffiness, and improve circulation. They just shouldn’t be mistaken for a way to remove chin fat. Fat reduction requires a process that physically alters the fat cell — something massage tools are biologically incapable of doing.
This is where many people feel frustrated. They aren’t “doing it wrong.” They’re simply using a tool designed for fluid on a problem caused by fat.
The myth of speed: “How to lose double chin in 5 Days”
It’s tempting to believe that you can banish a double chin quickly — especially with the endless flood of social media promises, viral hacks, and miracle cures claiming rapid results. Thousands of people search for “how to lose double chin in 5 days” or “how to fix double chin fast,” hoping for a shortcut.
Here’s the blunt truth: It’s biologically impossible to burn a significant pocket of fat in just a few days through natural methods. Fat loss is a gradual process that depends on your body’s metabolism and overall fat stores. Submental fat, in particular, tends to be stubborn and genetically influenced, often the last to go when losing weight.
That doesn’t mean you’re stuck forever — it just means fast fixes don’t exist in the natural realm. The only ways to see quick changes to your chin’s profile involve intervention:
Dehydration (such as sauna sessions or sweating) can temporarily reduce fluid under the skin, making your face look slimmer — but this effect is short-lived and doesn’t touch fat cells.
Liposuction physically removes fat but is invasive, requires downtime, and carries risks.
Fat dissolving treatments aren’t instant but offer permanent fat reduction without surgery. You’ll typically start seeing visible results around 4 to 6 weeks post-treatment as the body processes the destroyed fat cells.
So, if you’re looking for a realistic timeline, patience is part of the process. The promise of instant transformation through diet, exercise, or beauty tools alone simply doesn’t align with biology. Understanding this helps set healthy expectations and avoid costly disappointment.
When natural methods fail: The medical solution
If you’ve tried every diet tweak, practiced face yoga religiously, and rolled with gua sha tools, but that stubborn double chin remains, it’s not your fault — genetics often play a major role. Some fat pads are simply resistant to natural methods because of hereditary or hormonal factors.
This is where clinical fat reduction treatments step in. Fat dissolving offers a targeted, science-backed way to tackle double chin fat at its source. Unlike exercises that build muscle or gua sha tools that shift fluid, these treatments physically break down fat cell membranes.
Here’s why they work differently and better:
- They target the fat cell wall directly, causing the cells to rupture and permanently lose their ability to store fat.
- Your body then naturally metabolises and removes these destroyed cells over weeks, revealing a slimmer, more contoured chin.
- Results are natural, yet noticeable, and long-lasting.
For those who’ve exhausted natural options, and who are suitable for fat removal treatments, fat dissolving represent a logical, medically proven next step to reduce under chin fullness — precise, minimally invasive, and designed with your anatomy in mind.
We’ve ranked the 5 most common ways people treat a double chin.
[ctaForm]
Want to know more about double chin fat removal?
Learn more about double chin treatments in our complete double chin treatment guide.
Searching online for “double chin fat removal near me”?
Curious about whether you’re suitable for double chin fat removal? Explore our double chin treatment and start your journey.